Customizing Shopify email templates allows you to send branded emails that increase engagement and sales.
In Shopify, you can edit email templates in 3 ways or create a custom Shopify email template from scratch.
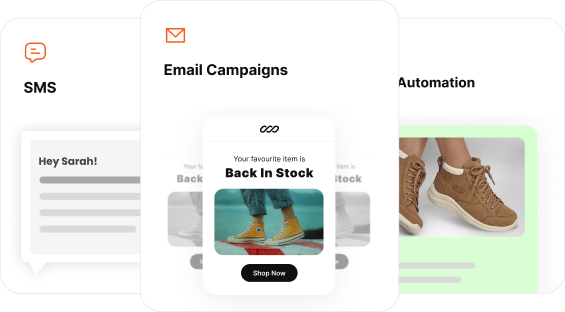
The types of Shopify emails you can send are many: transactional emails, post-purchase emails, abandoned cart recovery, back-in-stock, and more. Each requires a different approach. Let’s see them.
In this blog, we explain:
- Ways to customize Shopify email templates
- How to Customize Shopify Email Templates?
- 1st Method: Customizing Shopify order notification email templates
- 2nd Method: Customizing Shopify automated email templates
- 3rd Method: Customizing Shopify email campaign/ newsletter templates
- Essential Email Templates For Shopify
Let’s dive in.
Create custom Shopify email templates that reflects your brand in minutes with Retainful.
Types of Shopify Emails You Can Send
There are three types of emails you can send in Shopify email marketing:
- Order notifications (transactional emails) and shipping notifications
- Automated emails like abandoned cart recovery, welcome emails and
- Email campaigns/newsletter like product launch emails, announcements
Each of these Shopify emails requires different steps for template customization.
You can customize each of these Shopify email templates in 3 ways:
- Customizing order notification emails in Shopify default settings
- Customizing automated email templates in the Shopify Flow app
- Customizing Shopify email campaigns in the Shopify Email app
Pre-requisites for editing Shopify email templates are the Shopify Email app and Shopify Flows app.
How to Customize Shopify Email Templates?
To customize Shopify email templates:
- Step 1: Go to Shopify Admin -> Settings -> Notifications
- Step 2: Edit order confirmation email template
- Using default settings
- Using HTML Code
- Step 3: Send test email
Step 1: Go to Shopify Admin
To customize Shopify email templates, open your Shopify Admin and go to Settings -> Notifications -> Customer notifications.
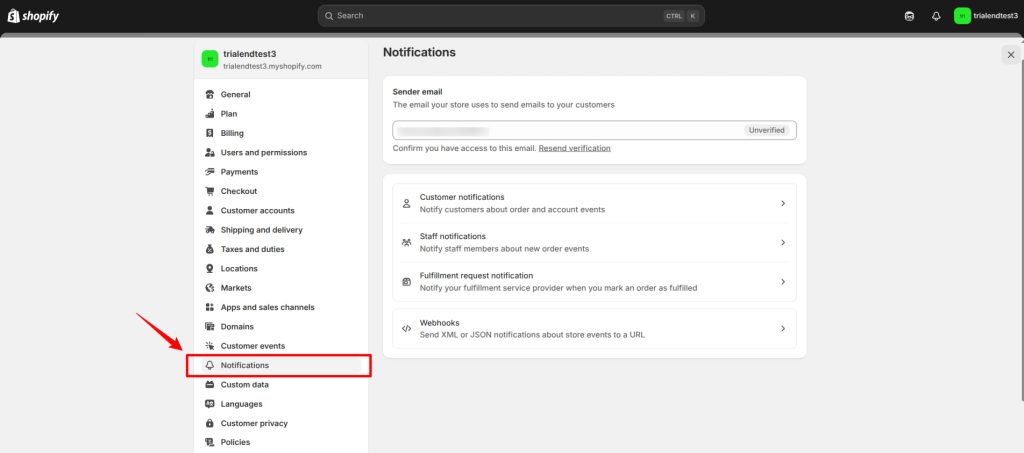
There will be a list of Shopify transactional emails sent after each event in the delivery process – like order confirmation, shipping confirmation, out for delivery, and more.
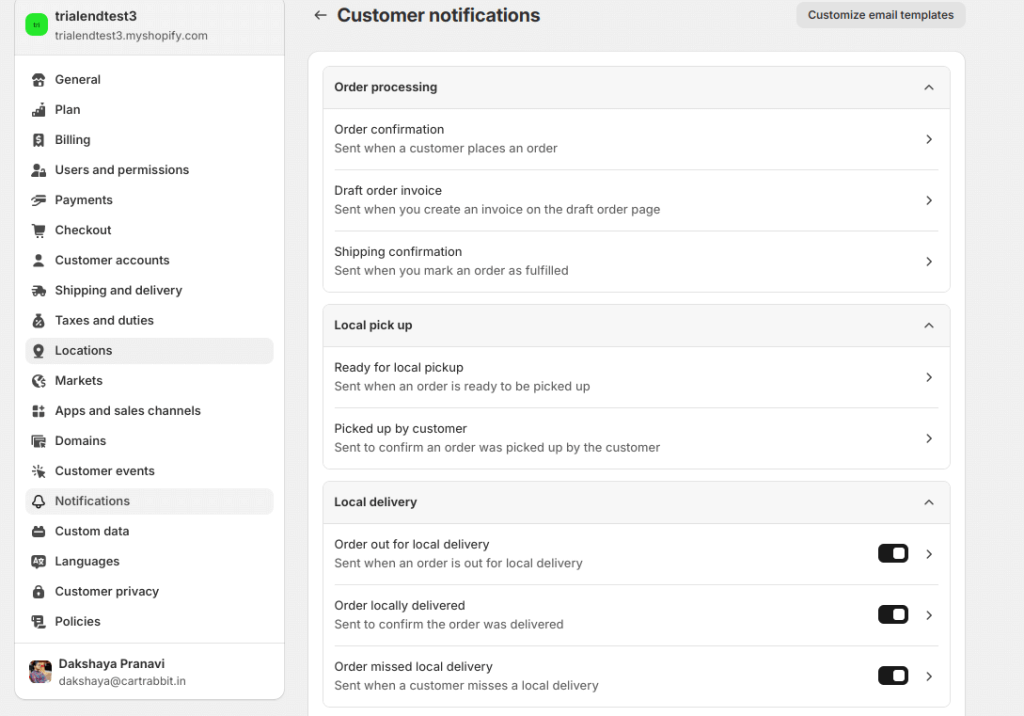
Step 2: Edit Shopify order notification email template
There are two ways you can edit the Shopify order email template:
- Default Settings
- Using HTML code
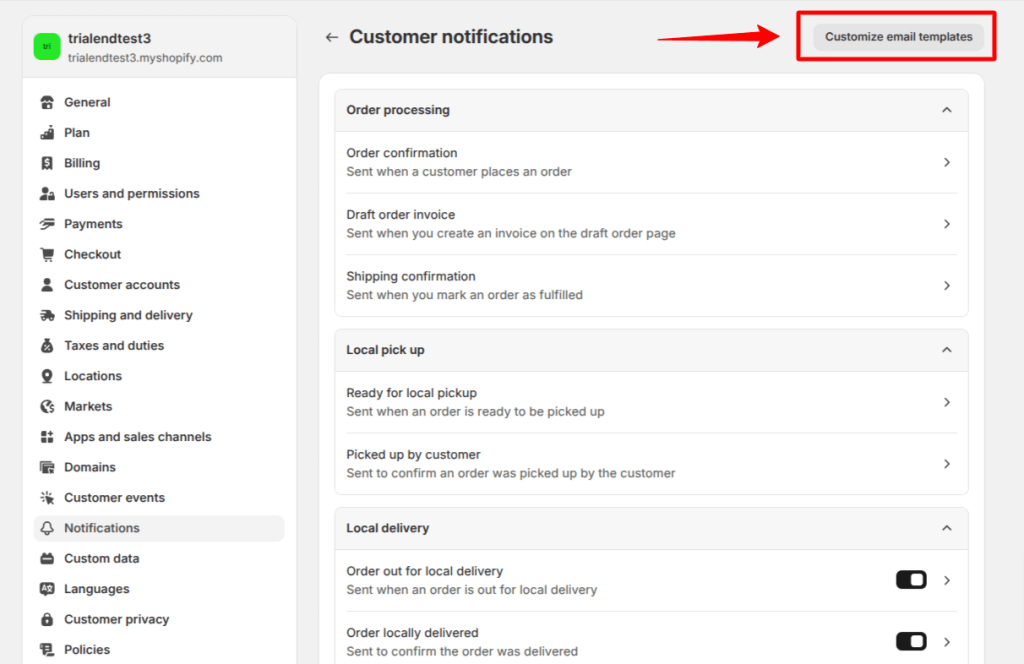
1. Default Settings
Click the ‘Customize email templates’ at the top of the page. The changes you make here will be reflected across all the templates.
In the default settings, you can only edit:
- Logo
- Accent color
To add logo to Shopify email templates for order notifications, upload the logo image in the Logo section.
2. Using HTML code
To create custom Shopify email templates for order notifications and make it on-brand, you can edit the HTML code.
For example, you can add a tax registration number to an invoice in the Shopify email template by editing the HTML code.

When you click ‘Edit Code’, an HTML editor will open.

Editing Shopify email templates using liquid variables allows you to personalize and dynamically generate content in your Shopify emails.
Liquid variables are placeholders that will be replaced with actual values when the email is sent. Shopify has a variety of built-in variables that you can use to pull data from your store, customer, or order.
Some common liquid variables for Shopify email template customization include:
- {{ customer.first_name }}: The first name of the customer.
- {{ order.number }}: The order number.
- {{ order.total_price | money }}: The total price of the order.
- {{ shop.name }}: The name of your Shopify store.
- {{ line_item.name }}: The name of the product purchased.
Step 3: Send test email
After finishing the Shopify order notification email customization, send a test email to check whether all the elements are in the right place as intended.
Customizing Shopify automated email templates
With Shopify email automation you can send customer life-cycle emails like abandoned cart emails, welcome email, upsell emails, win-back emails and more.
To customize Shopify automated email templates:
Step 1: Go to Shopify Admin -> Marketing -> Automations
Step 2: Choose the pre-built workflow template
Step 3: Select the email block and click ‘Edit Email’
Step 4: Edit subject line and preview text
Step 5: Customize the Shopify email template with drag-and-drop email editor
Step 6: Send a test email and turn on automation
Step 1: Go to the ‘Automation’ section
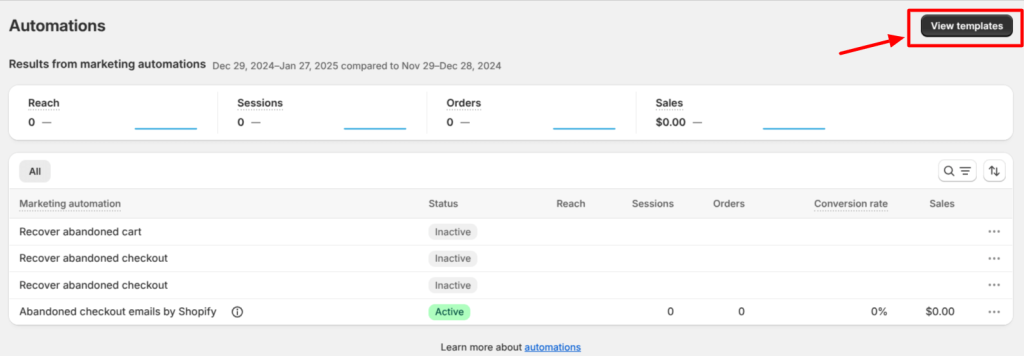
To customize Shopify automated email templates, go to Shopify Admin -> Marketing -> Automation.
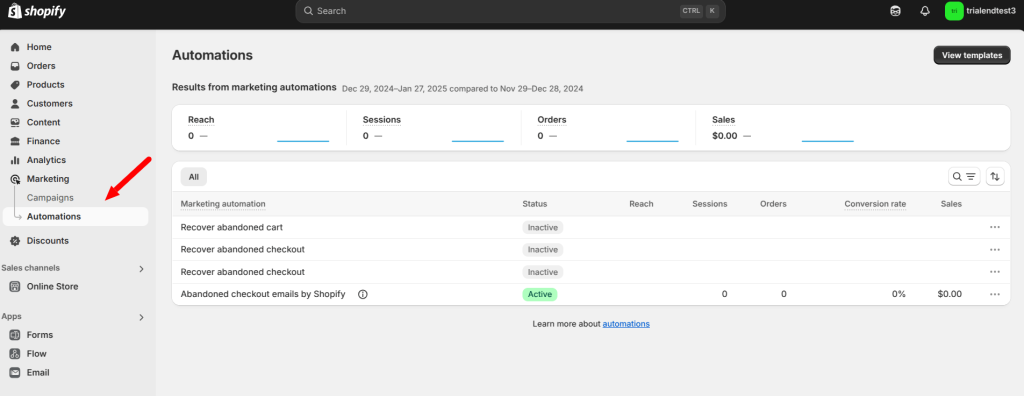
Click ‘View Templates’ to choose the pre-built workflow templates for automation like abandoned cart recovery, welcome email, thank you email, and more.
Step 2: Choose the pre-built workflow template
Shopify has many pre-built automation workflow templates where you can setup triggers, wait time and customize email templates for Shopify marketing automation.
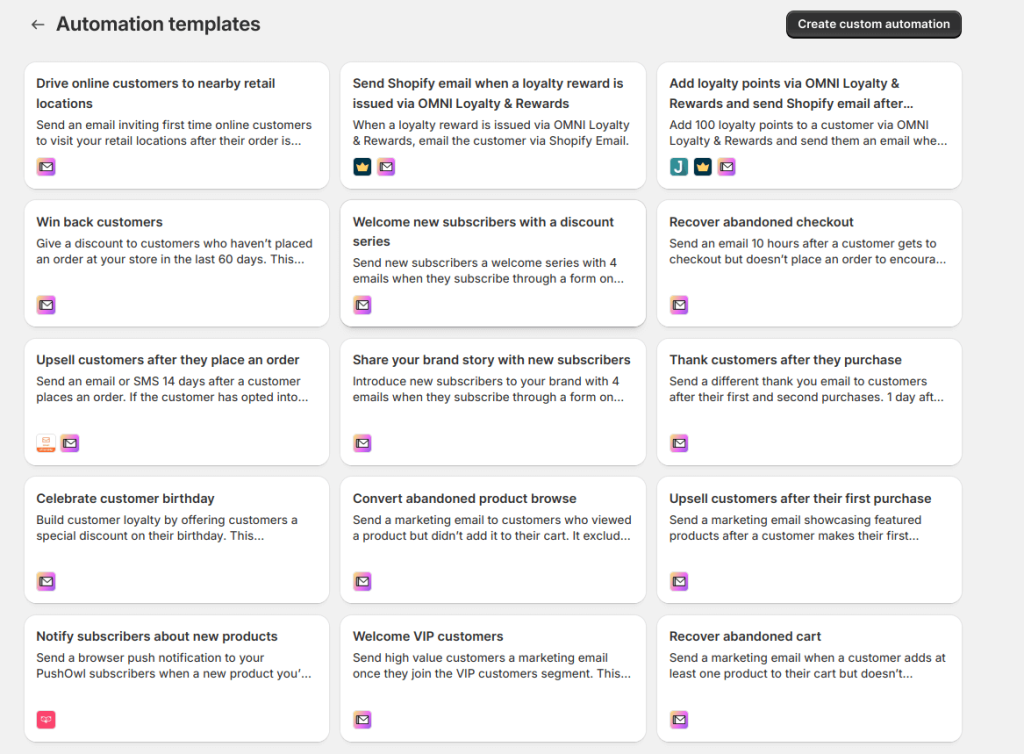
Choose the type of email workflow you want to automate.
Then, click ‘Edit’ to open the visual automation builder where you can edit Shopify email templates for email automation.
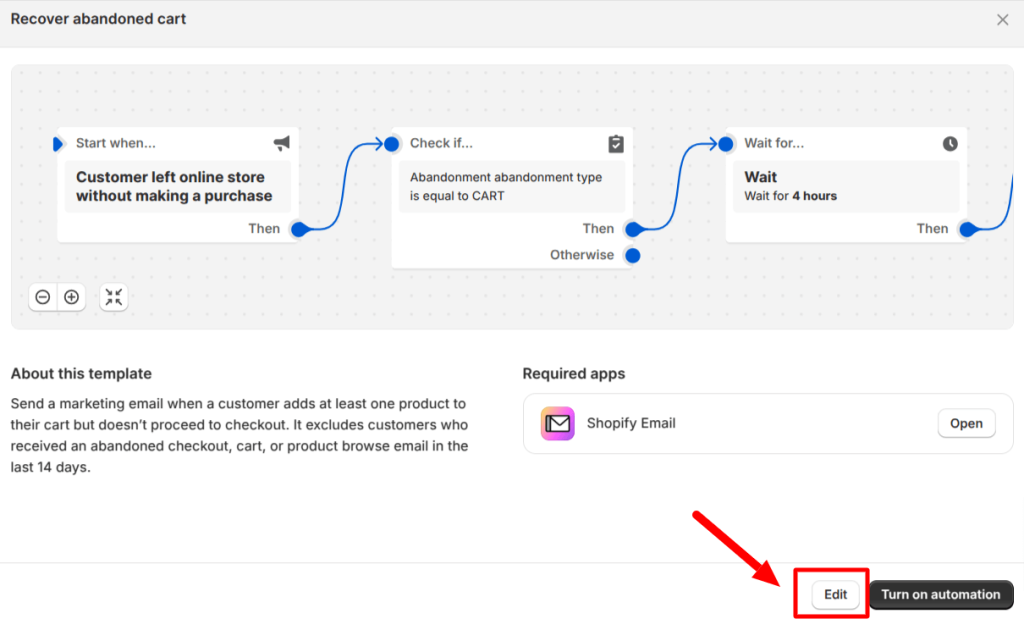
Step 3: Select the email block and click ‘Edit Email’
As soon as you click ‘Edit’, a visual automation builder will open.
Choose the Email block ‘Send Marketing Email’ and click ‘Edit email’ to open the drag-and-drop email editor.

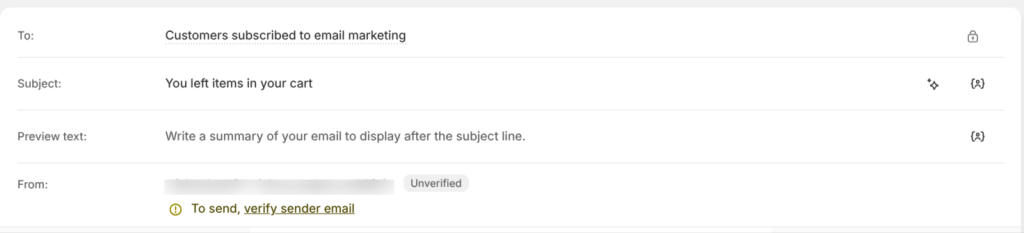
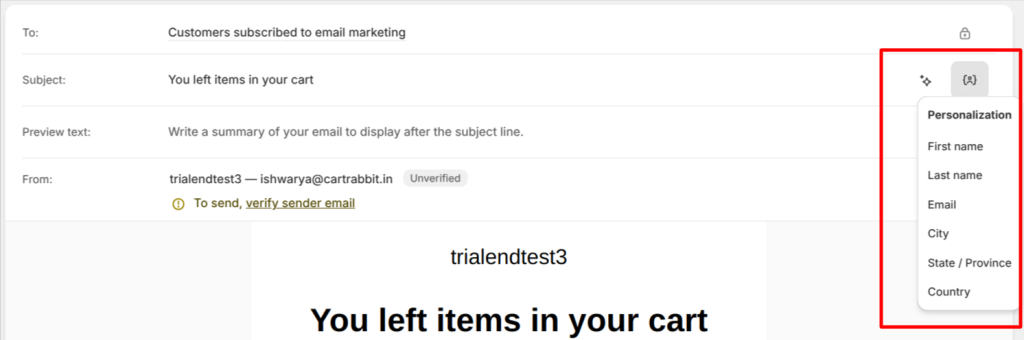
Step 4: Edit and personalize subject line and preview text
Before editing the Shopify email template, you have to configure:
- ‘To’ – By default it is set to customers who opted for email marketing.
- Subject line
- Preview text
- From address
To edit the subject line of the Shopify automated email templates in the ‘Subject’ section. You can use Shopify AI to generate subject lines for you.
To personalize Shopify email template’s subject line and preview text, click the icon at right end.
Step 5: Edit the Shopify email template with email editor
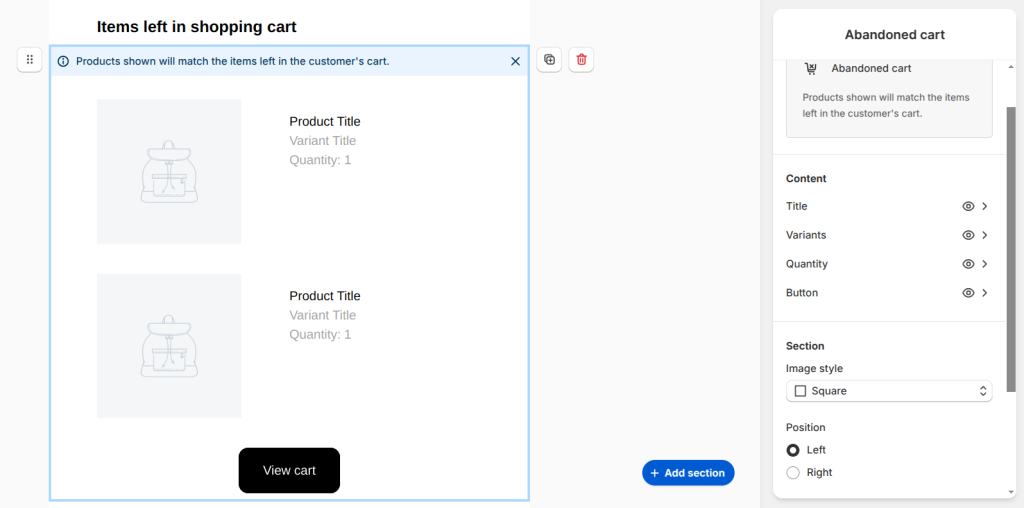
In the layout of the Shopify email template, click an element to edit their properties.
For example, in the Shopify abandoned cart email template, click the abandoned cart items section to edit its content like title, quantity, button and more.
To create on-brand Shopify email templates, you have to edit the logo or store name.
- To edit the logo in Shopify email template, click the logo element and upload the image.
- To show store name instead of logo in your Shopify email templates, choose ‘Store name’ instead of logo.
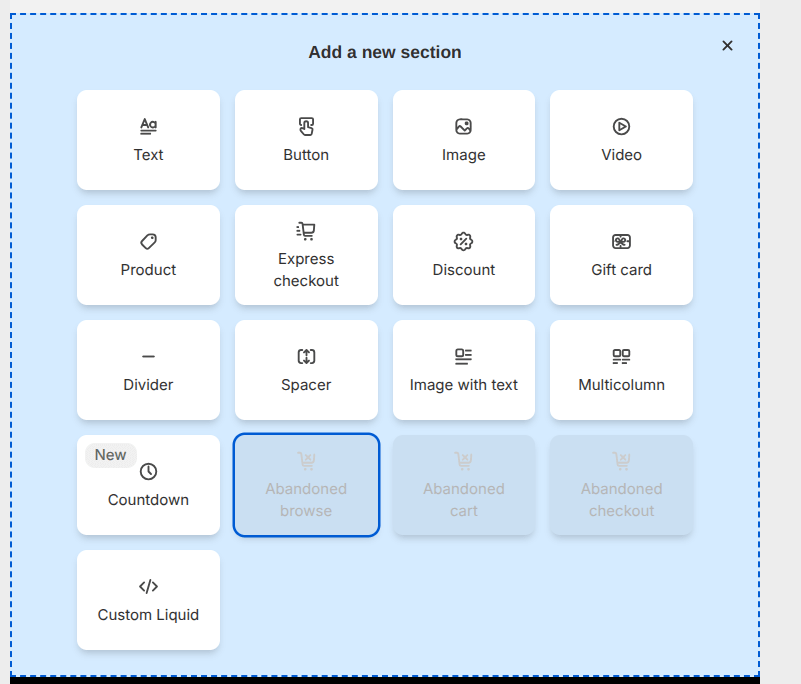
To add a new section in the Shopify email templates, click ‘Add section’ in the bottom right corner.
Step 6: Send test email and turn on automation
Preview the customized Shopify email template by clicking the device icons in the top right corner and check the responsiveness of the email template for Shopify.
Send the test email to your email address and turn on automation to send the Shopify emails automatically.
Customizing Shopify email campaign/newsletter templates
You can directly use the Shopify Email app to customize Shopify email campaigns and newsletters.
The steps to customize Shopify email templates for campaigns and newsletters are:
Step 1: Open Shopify Email app
Step 2: Choose the email campaign templates
Step 3: Customize Shopify email campaign template
Step 4: Preview and test
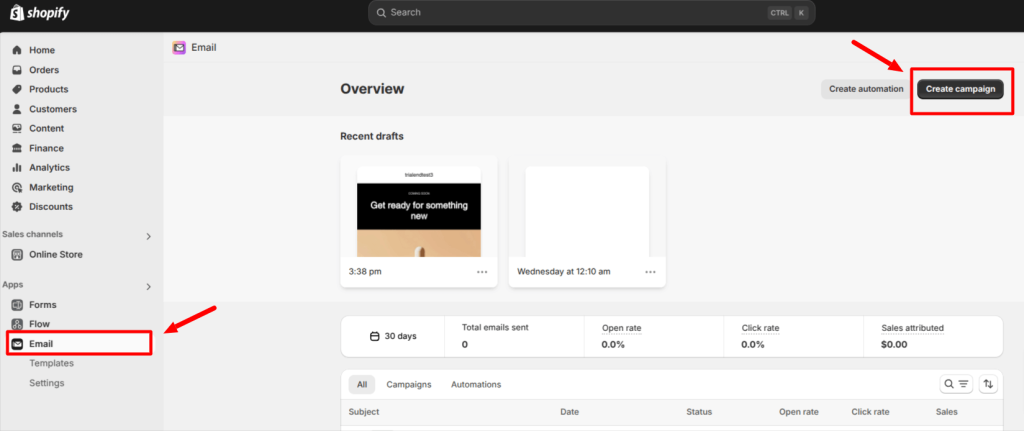
Step 1: Open Shopify Email app
To customize Shopify email templates for email campaigns, go to Shopify Email app and select ‘Create Campaign’.
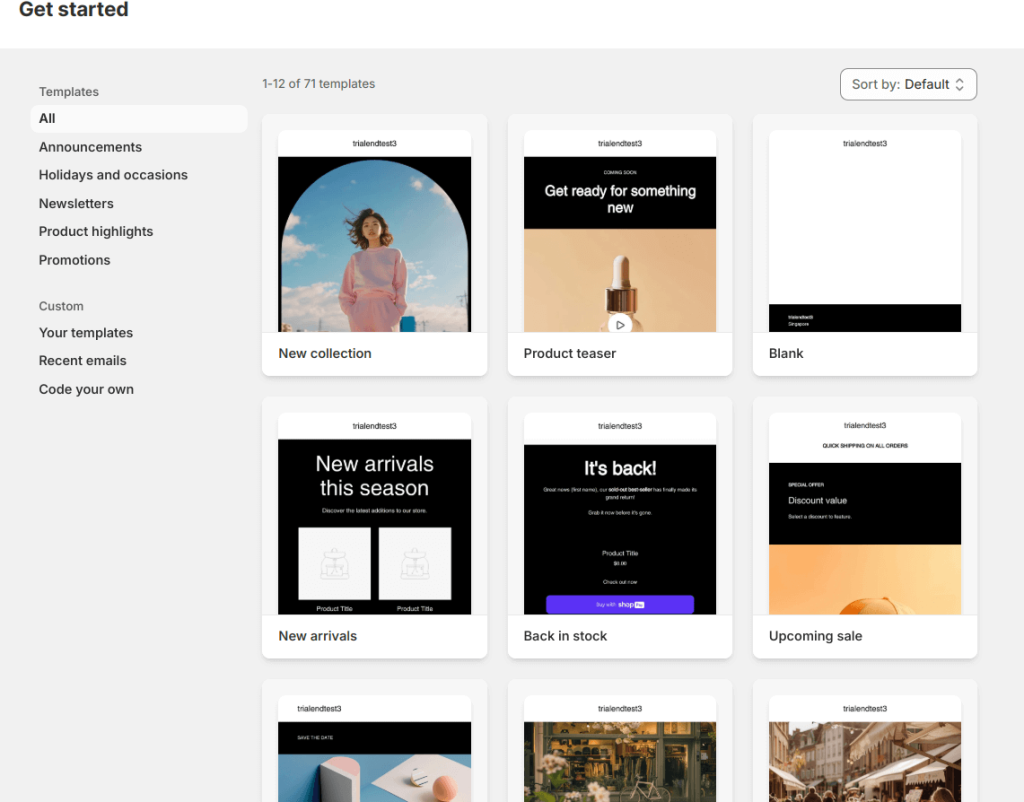
Step 2: Choose the type of email campaign
Shopify Email has a list of email campaign types and their ready-made templates like:
- Announcements
- Holidays and occasions
- Newsletters
- Product highlights
- Promotions
Select the Shopify email campaign template you want to edit.
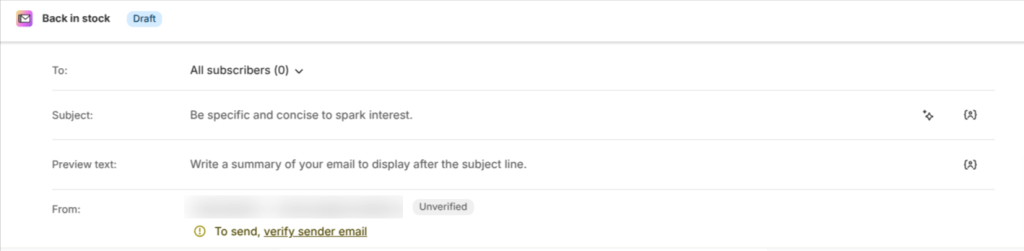
Step 3: Edit the Shopify email campaign template
Before customizing Shopify email newsletter template, setup:
- To – Choosing the audience/ customer segment
- Subject
- Preview text
- From address
In this step, choose which customer should receive your newsletter.
Shopify Email shows default customer segments like All subscribers, customers who haven’t purchased or purchased at least once.
To customize an element of the Shopify email campaign template, click the element and edit its style in the right side editor section.
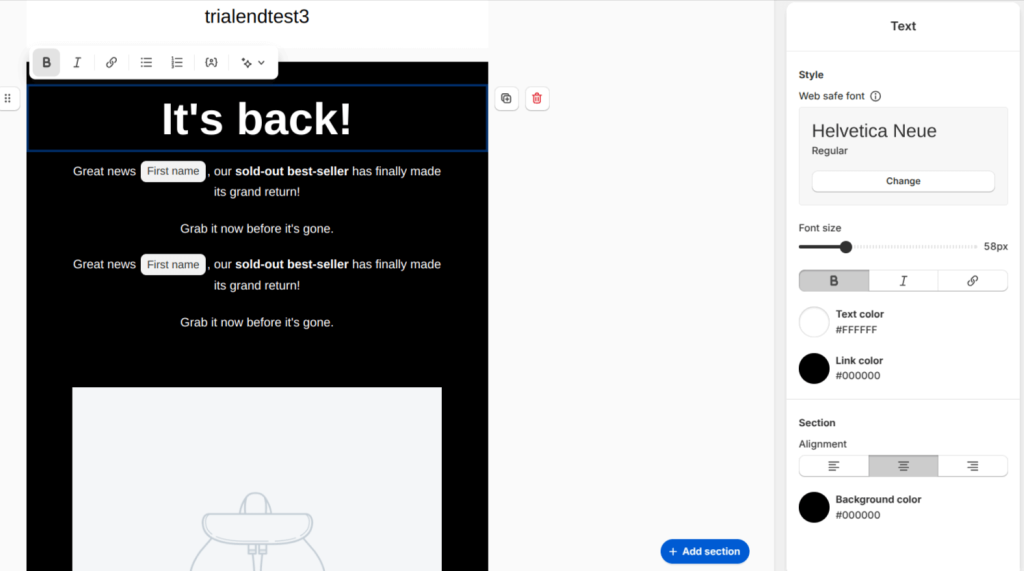
Here are the main template customization options in Shopify Email:
- Typography
- Background color
- Alignment
- Image style
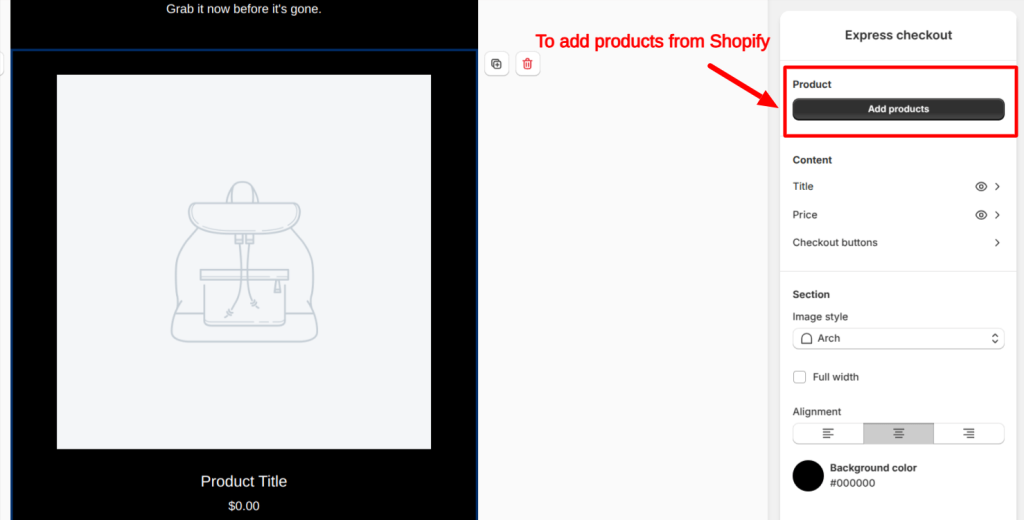
To customize your Shopify email template with product images, product name and price, click ‘Add Products’ and choose a product from your store.
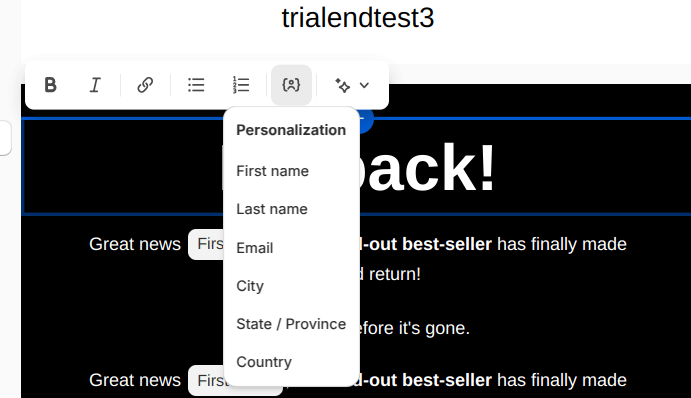
Apart from simple template customization in Shopify, it allows you to include simple dynamic content like first name, last name, country, city and more.
To personalize the Shopify email content with dynamic content, click the icon in the inline editor.
Step 4: Preview and test
Preview the edited Shopify email template and send test email to check if all the elements are displayed correctly.
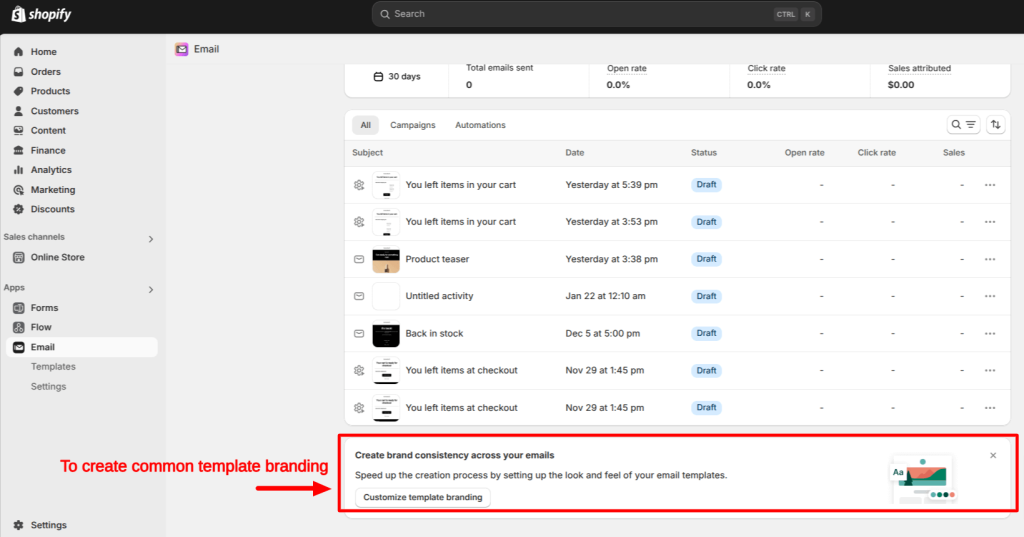
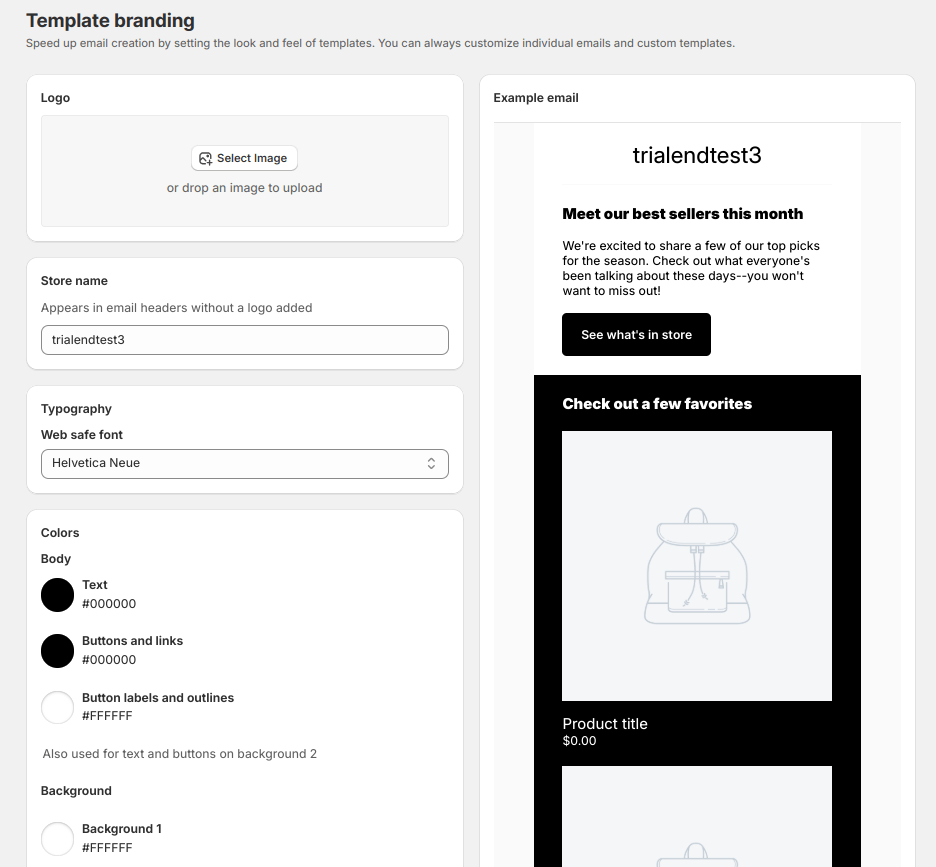
Creating Template Branding in Shopify Email
To create a common template branding across all the Shopify email marketing templates, go to Shopify Email -> Select ‘Create brand consistency across emails.
Note: This template branding will apply to all the Shopify automated emails and email campaigns/newsletters.
In the Template Branding, you can setup:
- Logo
- Store name
- Typography
- Colors for text, buttons
- Background color
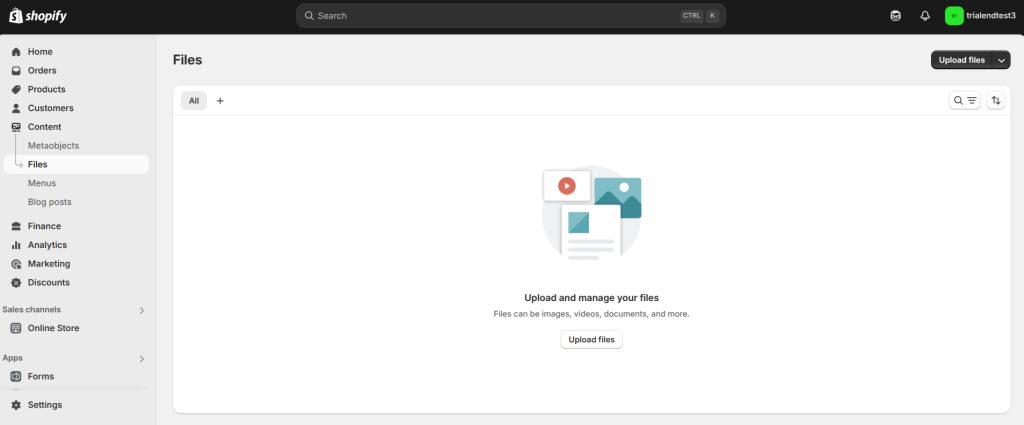
To add an email template to Shopify, go to Content -> Files -> Upload Files.
Limitations of Default Shopify Email Customization
- No intuitive drag-and-drop email editor
- No diverse ready-made email templates
- No dynamic coupon codes
- Limited customization options to change look and feel of the template.
Customize email templates in clicks with Retainful’s ready-made template library and drag-and-drop email editor.
Editing Shopify email templates with a third-party app
Retainful is the best email marketing app for Shopify, tailor-made for e-commerce stores.
In Retainful, you can create edit Shopify email marketing templates in minutes with:
- 70+ ready-made templates
- Drag-and-drop email editor
- Shortcodes for personalization
Get started with Retainful for effortless Shopify email customization:
- Install Retainful from Shopify app store
- Connect your store
- Choose if you want to customize automation email templates or email campaigns.
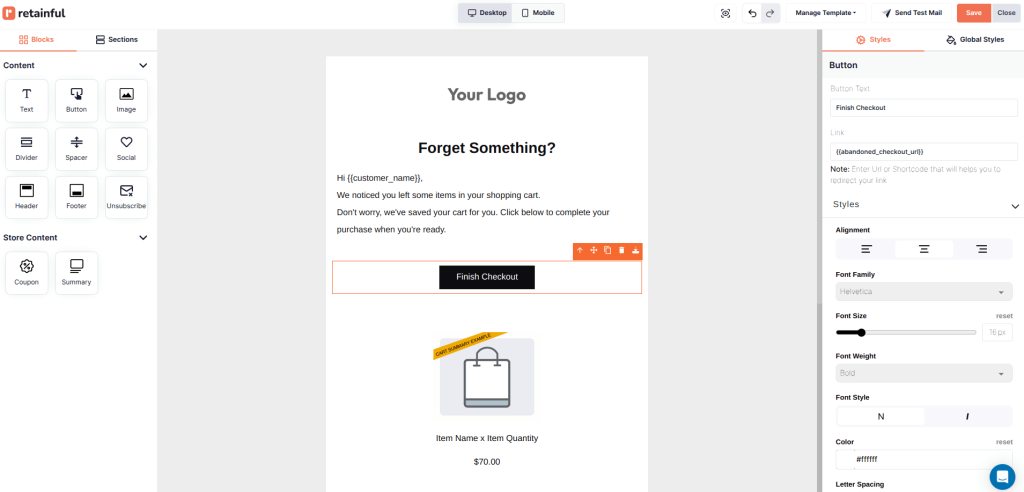
Drag-and-drop template editor in Retainful:
Ready-made template gallery in Retainful:

Essential Shopify Email Marketing Templates
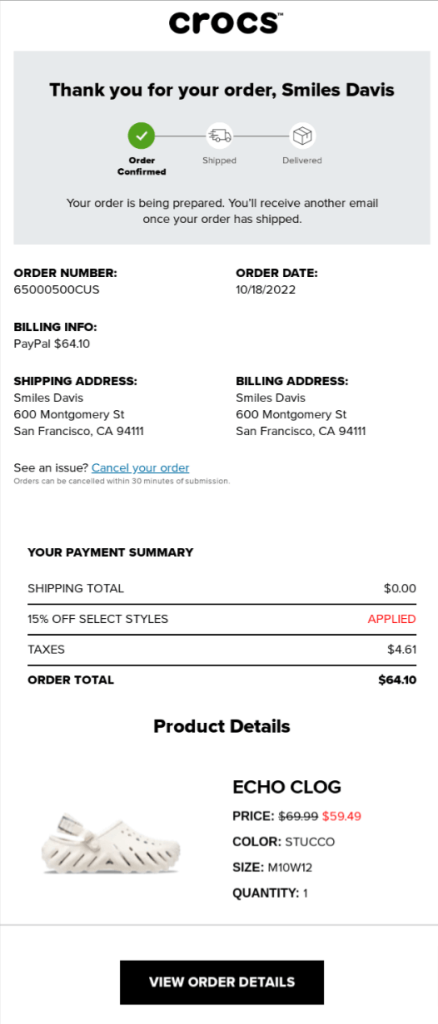
1. Shopify order confirmation email template
Shopify order confirmation emails are automated transactional emails you send to customers who have successfully placed an order in your store.
A good order confirmation email template should include details about:
- Products purchased
- Product price
- Delivery details
- An invoice
Here is an example Shopify order confirmation email template.
2. Shopify abandoned cart email template
Shopify abandoned cart recovery emails have proved to be the best abandoned cart recovery method in e-commerce email marketing.
Customize Shopify abandoned cart email template with:
- Images of abandoned cart items
- CTA to the cart page
- Price of abandoned cart items
- Reminder to complete the purchase
Here is an example Shopify cart recovery email template.

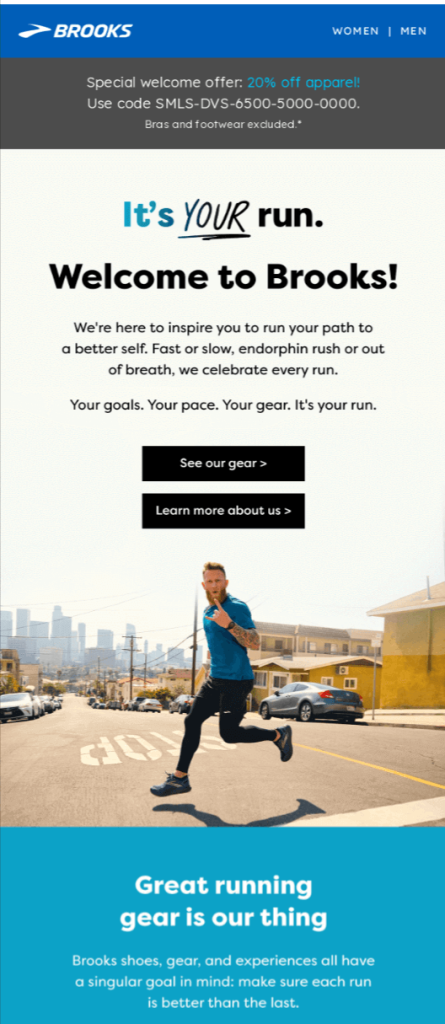
3. Shopify welcome email template
The purpose of the Shopify welcome email is to greet and thank the customer for signing up or making a purchase.
While editing this Shopify email marketing template include a warm welcome message and nudge them to explore your products.
Here is an example of Shopify welcome email template.
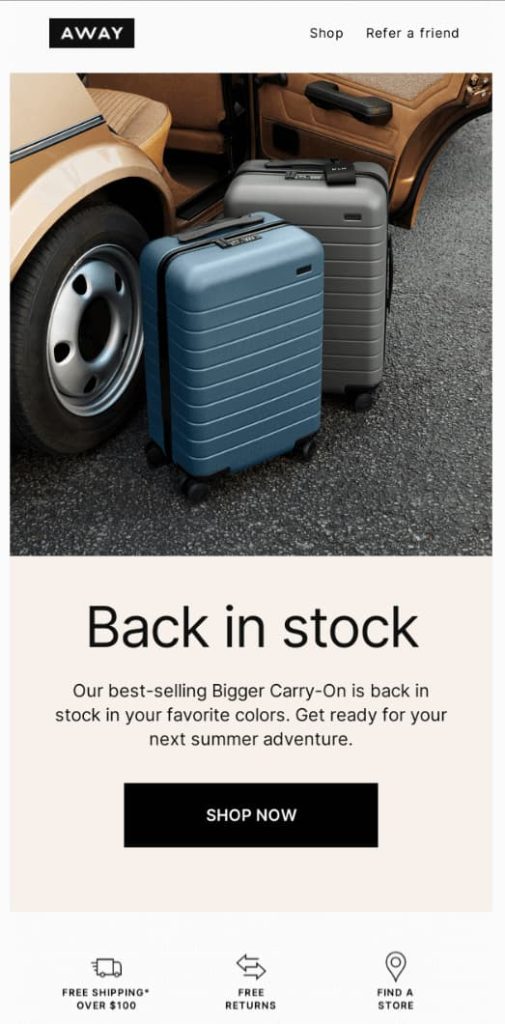
4. Shopify back-in-stock email template
A Shopify back-in-stock email template should include a clear product description, a prominent “Buy Now” button, limited-time offers, and urgency language (“Hurry, while supplies last!”).
Here is an example of a back-in-stock email template.
70+ pre-built email templates for every ecommerce occasion. Access them now with Retainful and send branded Shopify emails now.
Wrapping Up!!
While learning how to customize Shopify email templates, make sure every template reflects your brand and tone.
Editing Shopify email marketing templates with default settings can be cumbersome and time-consuming. It has limited options and templates to help you with the design load.
With Shopify email marketing app like Retainful, you can skip the design work with ready-made templates and drag-and-drop email editor.
Also Read:
- Shopify Email vs Klaviyo: A Detailed Review
- 9 Post-Purchase Email Examples That Retain Customers
- 10 Best Ecommerce Email Examples + Tips
- Shopify post-purchase email: How to Automate + Examples
Frequently Asked Questions
Yes, Shopify provides customizable email templates for various notifications like order confirmations, shipping updates, and promotional emails. These templates can be modified through the admin panel under “Settings” and “Notifications.” Or else you can acces email newsletter templates in Shopify Email app.
To create a custom email on Shopify, navigate to the “Notifications” section in the admin panel. You can modify existing templates or create new custom templates using HTML and liquid code.
Shopify offers an default feature for sending transactional notifications like order confirmations, shipping updates, and customer communication. It also provides Shopify email app, but you may need third-party apps for advanced features.
The best email for Shopify depends on your needs. Shopify Email is excellent for basic marketing, while third-party tools like Retainful or Mailchimp offer advanced automation, segmentation, and analytics for more complex campaigns.
To set up Shopify Email, install Shopify Email app. Go to the “Marketing” section in the admin panel and choose “Shopify Email.” Connect your store’s email, create campaigns, and configure settings like sender name, subject line, and target audience.
Yes, you can create custom emails in Shopify by modifying existing templates in the “Notifications” section or using third-party apps for more advanced features like custom designs, workflows, and personalized content.
Shopify emails typically use an HTML format with liquid code for dynamic content like customer names, product details, and order information. You can customize the structure, style, and cCan you change Shopify emails?ontent within the templates.
To set up custom emails in Shopify, access the “Notifications” section under “Settings.” You can edit existing templates, modify the HTML/CSS, or use Shopify Email App for campaigns/ newsletters and configure them through the admin panel.
Yes, Shopify allows you to customize email templates under the “Notifications” section. You can adjust the content, layout, and dynamic fields to align with your brand’s voice and marketing goals.
To add a custom font to Shopify emails, you need to edit the email template’s HTML and CSS. Include the custom font in the style section, using either a hosted font or embedding a web font.
To change email templates in Shopify, open your Shopify Admin and go to Settings -> Notifications -> Customer notifications. Click the ‘Customize email templates’ at the top of the page. The changes you make here will be reflected across all the templates.
Step 1: Go to your Shopify Admin Panel.
Navigate to Settings > Notifications. Once you’re in the email template editor, you can insert an image by using the HTML editor.
Step 2: Before adding an image to the email template, you need to upload the image to Shopify’s Files section.
Step 3: From your Shopify Admin, go to Settings > Files. Click Upload files and select the image you want to use in your email. Once uploaded, Shopify will generate a URL for the image.
Step 4: Use the image URL generated by Shopify’s Files section in the HTML editor.