Shopify welcome email is like a first handshake with a customer. How do you want it to be?
Writing a compelling welcome message involves setting the tone for what it is like to do business with you and communicating your brand’s story, values, and USPs.
These emails also influence the future engagement a customer wishes to have with your brand. The data says so, too. Customers who receive a Shopify welcome email newsletter show 33% more engagement with the brand.
So how can you get it right to reap all these benefits?
This blog will help you achieve that by explaining how to create a Shopify welcome email, what a Shopify welcome email series should contain, and how to automate it.
Let’s dive right in.
Send compelling welcome emails easily with Retainful’s ready-to-use email templates.
Why should you send Shopify welcome emails?
What is a Shopify Welcome Email?
A Shopify welcome email is an automated message sent to new customers, introducing them to your store, offering a special welcome offer, or telling your brand story.
You should send Shopify welcome emails to make a great first impression and make the customer feel special and valued right from the get-go. It’s your opportunity to introduce the brand and what it offers.
More than the ability to engage customers from the start, it has some impressive stats up its sleeves. Here are some:
- High open rate: They have an open rate of about 50-60%, significantly higher compared to standard marketing emails.
- High click-through rate: They often see click-through rates of about 20-30%, which is remarkably higher than the average CTR of around 2.5% for regular emails.
When it comes to the onboarding process, sending Shopify welcome email newsletters helps ease new customers into your brand ecosystem by providing essential information, setting expectations, and fostering a positive initial experience.
Your Shopify welcome message can guide new customers on what to do next, like checking out your latest products, following you on social media, or giving them a heads-up on upcoming sales or events.
It’s like giving them a little nudge to explore more.
How to create a Shopify welcome email?
Creating a good Shopify welcome email means that it engages the customer and makes them want to see more of you in their inbox.
The steps to create a Shopify welcome email are:
- Step 1: Define your goals
- Step 2: Segment your customers
- Step 3: Craft compelling subject lines
- Step 4: Customize the Shopify welcome email template
- Step 5: Test and optimize
Let’s learn the steps in detail.
Step 1: Define your goals
Before starting to write, determine what you want to achieve by sending Shopify welcome emails – is it to introduce your brand, encourage the first purchase, or increase engagement with your content?
These clear objectives will guide the content and structure of your emails.
For example, if your goal is the brand introduction, your first welcome email newsletter might focus on your story – how you started, what sets you apart, and what customers can expect in terms of product quality, customer service, and community involvement.
Step 2: Segment your customers
Every customer is not the same, even if they are new ones. So, segmenting your customers based on criteria like below will help you personalize your Shopify welcome message and make it relevant to each customer.
- New Subscribers vs. First-time Buyers: Customers who sign up for your email newsletter might be interested in different content compared to those who made their first purchase.
- Purchase Behavior: Look at what they bought or added to their cart. This can give you clues about their interests.
- Engagement Level: How they interact with your website or previous emails can also be segmentation criteria. For instance, customers who frequently visit certain product pages might be interested in more information about those items.
Step 3: Craft compelling subject lines
Creating a compelling Shopify welcome email subject line is crucial as it greatly influences the open rates of your emails.
Phrases that evoke urgency or curiosity can encourage recipients to open the email.
For instance, “Limited Time Welcome Gift Just for You!” or “You Won’t Want to Miss This Welcome Surprise!” can create excitement and prompt immediate action.
Step 4: Customize the Shopify welcome email template
Your Shopify welcome email template should align with your brand identity and effectively communicate the message. Customizing involves adding elements and making the welcome email design reflect your brand’s personality.
- Introduce Your Brand
While writing a welcome email in Shopify, introduce your brand in a way that connects personally with the customer. Share your story, mission, or the values that drive the brand. - Include clear CTAs
Your call-to-action (CTA) should be clear and concise, telling customers exactly what you want them to do next. This could be “Shop Now,” “Learn More,” “Join our Community,” etc.
Also, make sure your CTAs in your welcome email template stand out visually. Giving it a contracting color would do the job. - Provide a welcome offer
Ensure that your welcome offer is prominently displayed and the terms are clearly stated. For example, “Enjoy 15% off on your first order” or “Free shipping on your first purchase!”. - Personalize to increase relevance
Personalization goes beyond just addressing the recipient by name. It involves tailoring the Shopify welcome message to meet their specific interests, behaviors, and interactions with your brand.
For example, if a customer browsed a specific category but didn’t make a purchase, your Shopify welcome email design can include products or information from that category.
Make sure you are personalizing the emails based on the segments you have created.
Customize every element of your welcome email templates effortlessly with Retainful’s drag-and-drop email editor.
Step 5: Test and optimize
Finally, test different aspects of your Shopify welcome emails, like subject lines, content, and send times. Use A/B testing to see what works best and continually optimize based on the data.
Track KPIs like open rates, click-through rates, and conversion rates to measure success.
Why do you need a Shopify welcome email series?
Shopify welcome email series is a sequence of emails you send after the initial welcome message. Rather than a single email, spacing out what you want to convey over 3 or 5 gives multiple touchpoints for customer engagement and spares you from cramming all your ideas into one.
Unlike a single email, creating a Shopify welcome email series allows for a step-by-step introduction to your brand. Instead of overwhelming customers with too much information at once, you can gradually educate them about different aspects of your business.
Plus, each email is a perfect chance to throw in a little something extra, like a discount code or a special offer.
Here is the right welcome email sequence and what to include in each of them.
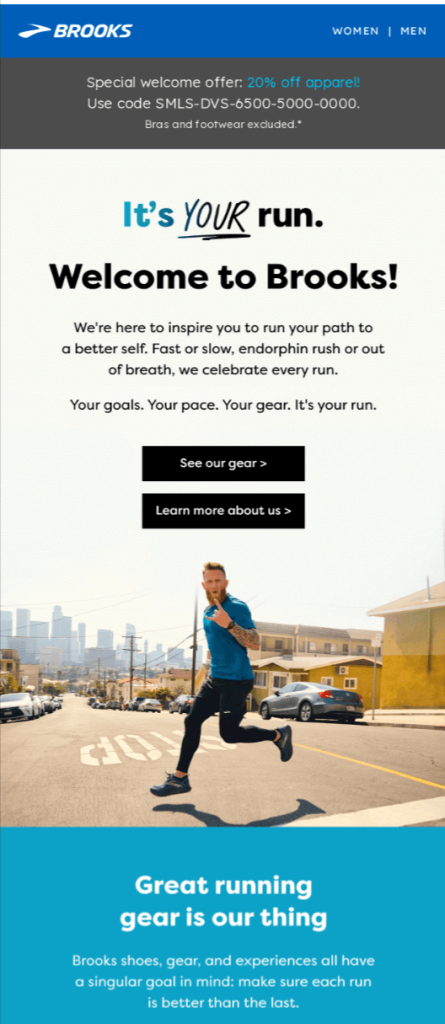
Email 1: The Initial Welcome
The purpose of the first email in the welcome email sequence for Shopify is to greet and thank the customer for signing up or making a purchase.
You can include a warm welcome message and a brief introduction to your brand.
Send this welcome email immediately after sign-up or first purchase.
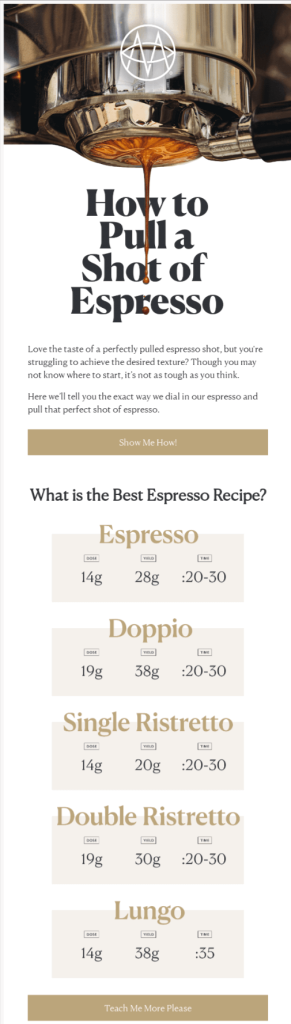
Here is a Shopify welcome email example by Brooks.
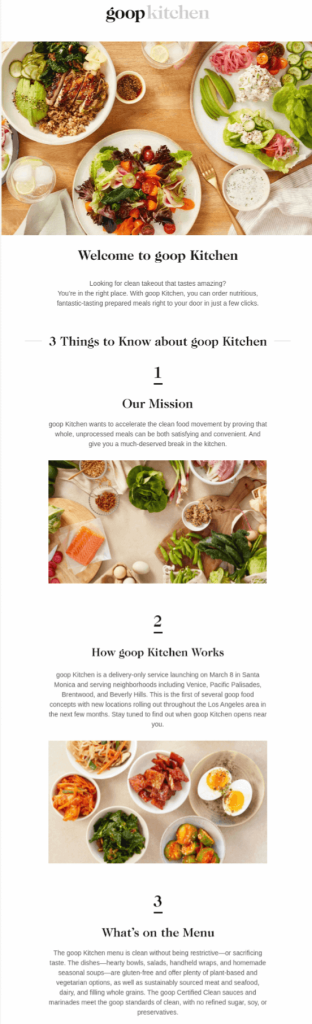
Email 2: Brand Story and Value Proposition
The second email in Shopify welcome email series is to deepen the subscriber’s understanding of your brand.
While creating this welcome email sequence in Shopify, you can include your brand story, core values, unique selling propositions, and maybe a founder’s message.
The best time to send this email is 1-2 days after the first email.
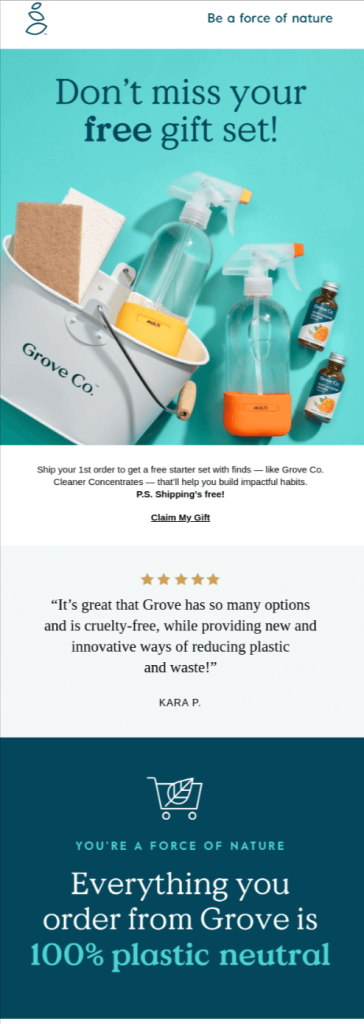
Here is a welcome email example by GoopKitchen.
Email 3: Engage and Educate
To engage the customer with useful content or educate them about your products/services.
Send helpful guides, product usage tips, customer testimonials, or how-to videos.
Send the third email in the welcome email sequence 3-5 days after the second one.
Here is an educational welcome email template for Shopify.
Email 4: Incentivization
To encourage the subscriber to make their first or next purchase, give a special offer, discount code, or free shipping.
You can send the fourth email 7 days after the third one.
Here is an example of a welcome email template for Shopify.
Email 5: Community and Social Proof
The last email of the welcome email series in Shopify is to provide personalized engagement and go beyond just making a sale.
You can include an invitation to join your social media communities, customer reviews, user-generated content, or case studies.
The best time to send the last email in the welcome email series is 10 days after the fourth email.

How to automate your Shopify welcome emails using Retainful?
With the help of email automation, sending welcome emails in Shopify is effortless.
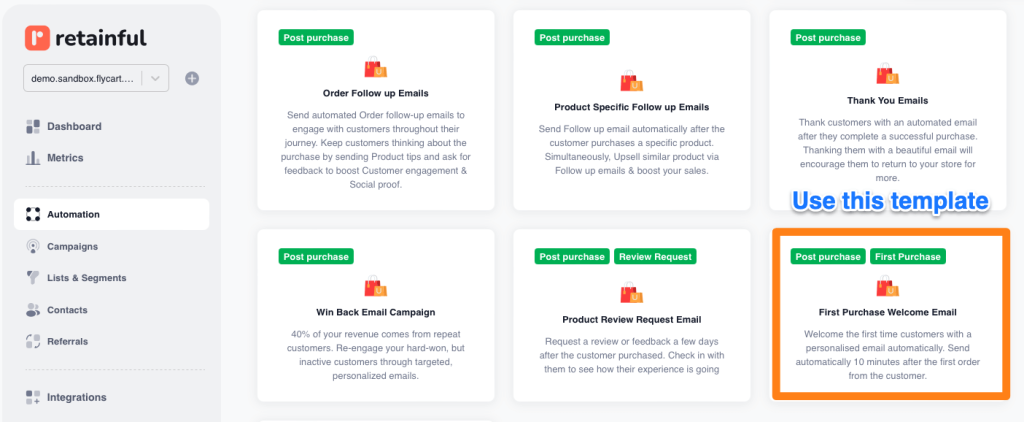
Our Shopify email marketing app, Retainful, has pre-built workflows that are easy to set up. Configure the workflow with a few easy steps, and all your Shopify email marketing campaigns can run on their own.
Creating a welcome email sequence is also easy in a Shopify email marketing app like Retaainful, as it takes only a few clicks to add them
Let’s see how you can create Shopify automated welcome emails easily using Retainful.
Step 1: Installing Retainful
Login to your ‘Retainful’ dashboard and go to ‘Automation’ -> Create Workflow -> Choose ‘First Purchase Email’ template.
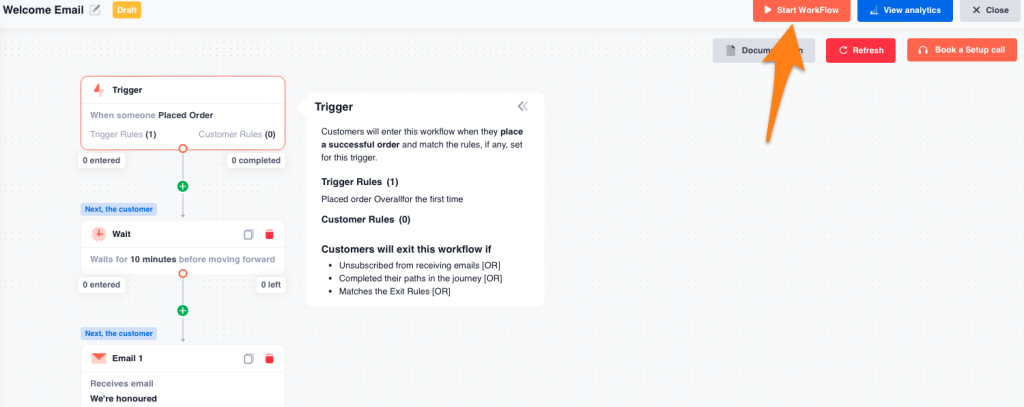
Now, you will be redirected to the workflow builder.
Step 2: Setting up the triggers and wait time
There are two things that set the email automation in motion – triggers and wait time.
The trigger lets you determine when a customer can enter into the workflow. In Retainful’s welcome email workflow, the trigger is set in such a way that first-time customers alone can enter into the workflow.
Click the Trigger block to view the trigger rules applied. You can add more rules like product ID, product name, order status, and more.

The ‘Wait’ block allows you to set up a time delay, that is when you want to send the welcome email after the customer has made the purchase.
You can also set customer rules based on the customer properties like name, country, number of reentries allowed, and more.
Step 3: Customizing the welcome email template
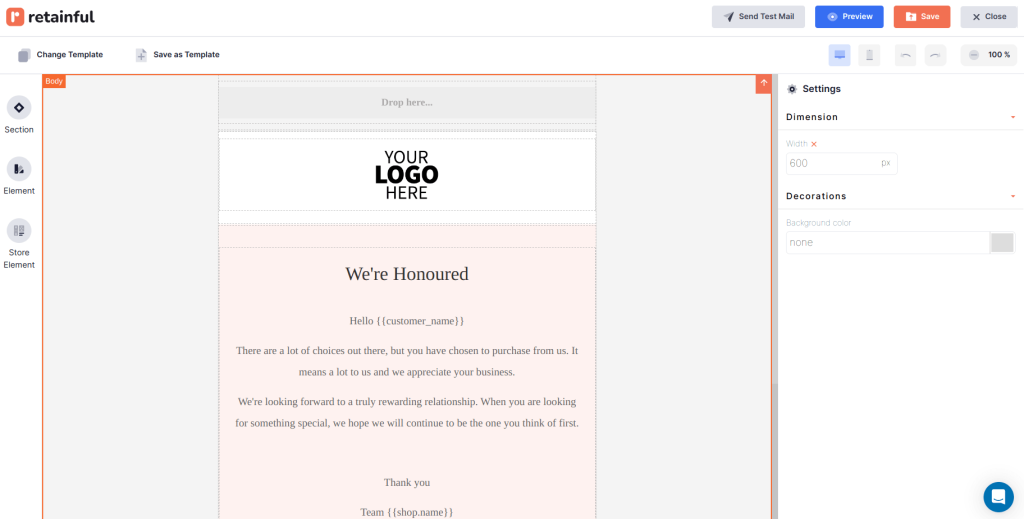
After the wait block, you will find the 1st ‘Email’ block of the workflow. Click on it to customize the Shopify welcome email subject line, preview text, and email content.
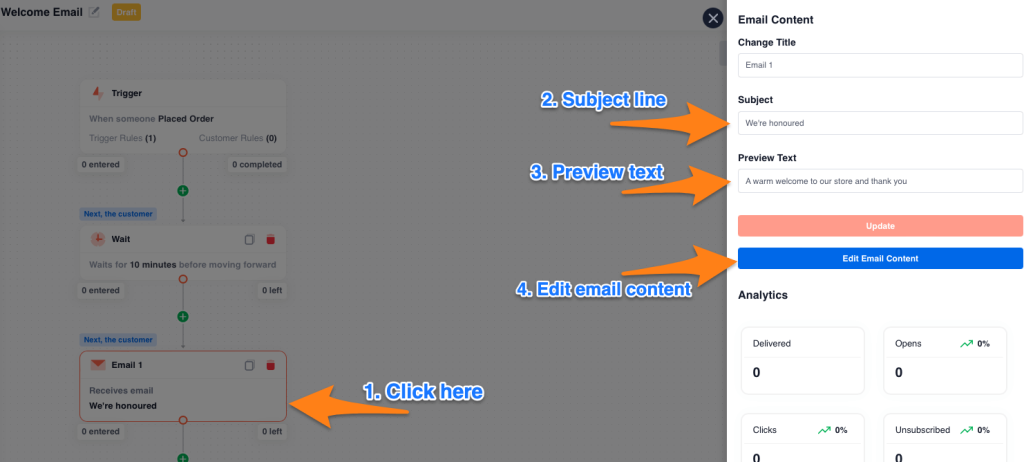
To change the email template, you can click on the ‘Change template’ button.
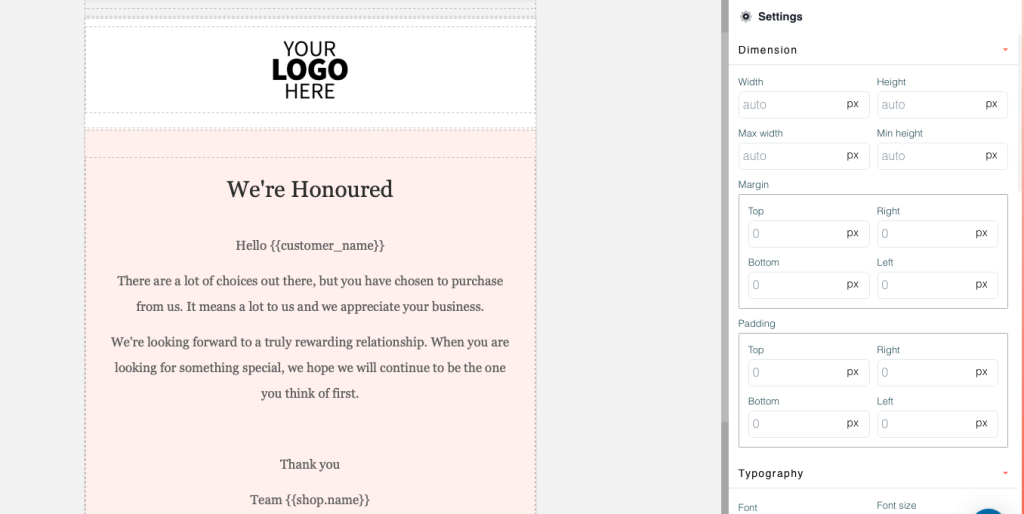
You can customize every element of your Shopify welcome email design using a drag-and-drop email editor. Click an element on the right side, you will have options to change dimensions, background color, typography, and more.
On the left side, you will find options to add a section, partition a section, and add store elements like discount coupons, an unsubscribe option, and more.
You can also personalize the welcome email design in Shopify using shortcodes like,
- {{billing_address.first_name}} – The first name of the customer.
- {{billing_address.last_name}} – The last name of the customer.
- {{customer_name}} – The full name of the customer (the first and the last name)
To add a discount code to the welcome email in Shopify, click the ‘Store Element’ and choose Discount Coupons.
Step 4: Creating a Shopify welcome email sequence
To create a welcome email sequence in Shopify, you can add more email blocks and their corresponding wait block to the workflow just by clicking the plus symbol at the end of it.
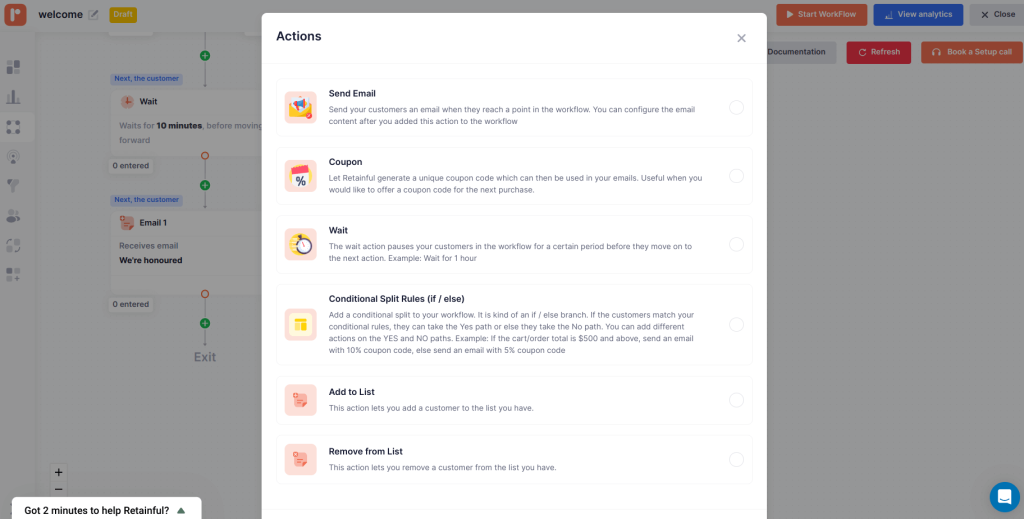
If you want to send the second Shopify automated welcome email to a set of customers who satisfy a different rule than the first one, you can add a conditional split and define a new rule for the customers who should receive the second email.
Similarly, you can set up the other emails in the Shopify welcome email series.
Step 5: Testing Email
To check if your Shopify automated welcome email has come out as intended, click “Send Test email”.
Click “Start Workflow” to set it live.
That’s it. You have created welcome email newsletters, and they are ready to be triggered automatically and sent to customers.
Automate and launch your welcome email series in minutes with Retainful’s easy-to-setup automation.
Wrapping up!!
Shopify welcome emails set the tone for your relationship with your customers. Show them that you value them, and they’re more likely to stick around.
Writing a welcome email in Shopify is an essential step to building a lasting relationship with your customers. It’s more than just a formality.
We have seen how to create a welcome email, why you need a welcome email series, and how to automate them using a Shopify email marketing app, Retainful.
Learn more about email marketing.
- How to Customize Shopify Order Confirmation Emails? – A Step-by-Step Guide
- Top 10 Email Marketing Automation Apps For Shopify
- How to Create a Successful Email Marketing Campaign?
Frequently Asked Questions
Yes, you can have a custom welcome email on Shopify. Customize the template under ‘Settings’ > ‘Notifications’ to tailor the content and design to match your brand’s style and message.
But the scope for customization in Shopify is limited. You can use a Shopify email marketing app like Retainful to customize every element of your email.
A good welcome email warmly greets the new subscriber, introduces your brand, offers value through content or discounts, and includes a clear call-to-action, all while reflecting your brand’s unique personality.
To write a professional welcome email, use a polite tone, clearly introduce your company, express gratitude, provide relevant information or next steps, and maintain concise and formal language.
In Shopify, create a welcome email template by going to ‘Settings,’ then ‘Notifications.’ Choose ‘Customer welcome email’ and customize the content and design to align with your brand.
A welcome email series for e-commerce is a sequence of automated emails sent to new subscribers, introducing them to the brand, offering value, and encouraging engagement and first purchases.
A welcome email series typically consists of 3-5 emails. This range allows for effective communication of key messages without overwhelming the subscriber.