Do you own an eCommerce business? Then, it would be best if you tried establishing your presence on this popular social platform, Facebook.
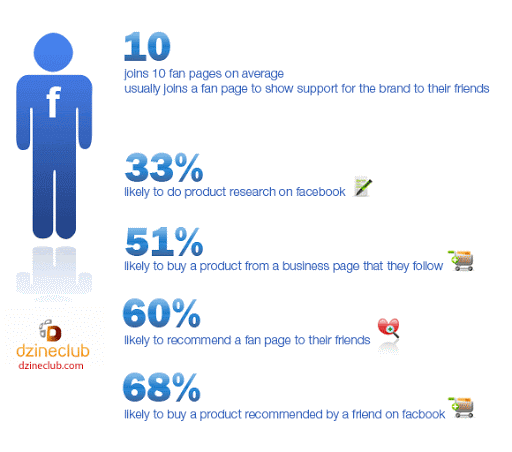
With a staggering 2.6 billion users worldwide and 1.6 billion logging in every day, the Facebook page holds countless opportunities to expose your business worldwide.
We’ve been experimenting with all sorts of marketing tactics on Facebook, and now we are going to show you one such successful tactic, how to create a Facebook business page.
Are you Wondering how to set up a Facebook page for your Shopify store? Dive into this article as we list out the checklist to create a Facebook business page.
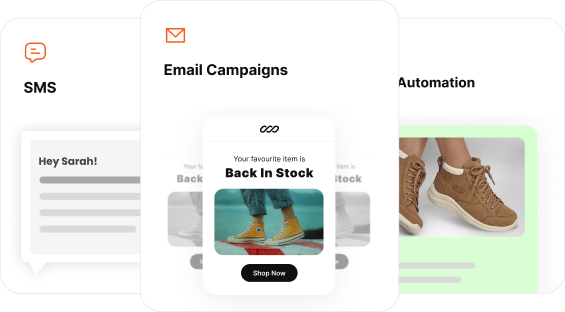
Boost Customer Retention by guiding them using timely, automated, and personalized emails with Retainful.
What is a Facebook business page?
A Facebook business page provides an opportunity for online businesses to establish their presence on the biggest social media platform.
Billions of users can discover your Shopify store through your business page, you can boost your reputation by interacting with your customers.
Remember, a business page is not similar to a personal profile. A business page has an ecosystem of features like post scheduling, advertising, and analytics which can help your marketing campaign.
Why do you need a Facebook business page?
When you own a Shopify store or a product like abandoned cart recovery, you need to constantly experiment with every possible way to promote your Shopify store. And that is exactly why you should set up a Facebook business page for your Shopify store; to increase your brand awareness, drive conversions, and achieve more sales.
Many Shopify stores don’t have a business page; sadly they are missing an ocean of marketing opportunities that can propel your Shopify store to the sky.
Don’t be one of them, make hay while the sun shines, right? Create your business page when it is due, don’t sit it out. These are a few things you can strike out on your Facebook page checklist,
- Share your business-related content every day.
- Market/advertise your products with gifs, images, and videos.
- Share influential posts about your brand.
- Showcase your customer reviews and establish trust.
- Interact with your customers.
- Share your success stories, fosters a personal touch.
- Share updates and news about your products.
Does it cost to create a Business page?
Just like other features of Facebook, like personal profiles and groups, creating and managing a business page is free.
Why doesn’t Facebook charge you? Because you are already bringing more traffic to Facebook through your followers, that’s why.
But there is a paid feature on Facebook, ads. Even though ads are unrelated to the business page you can still make use of the feature to reach more audiences.
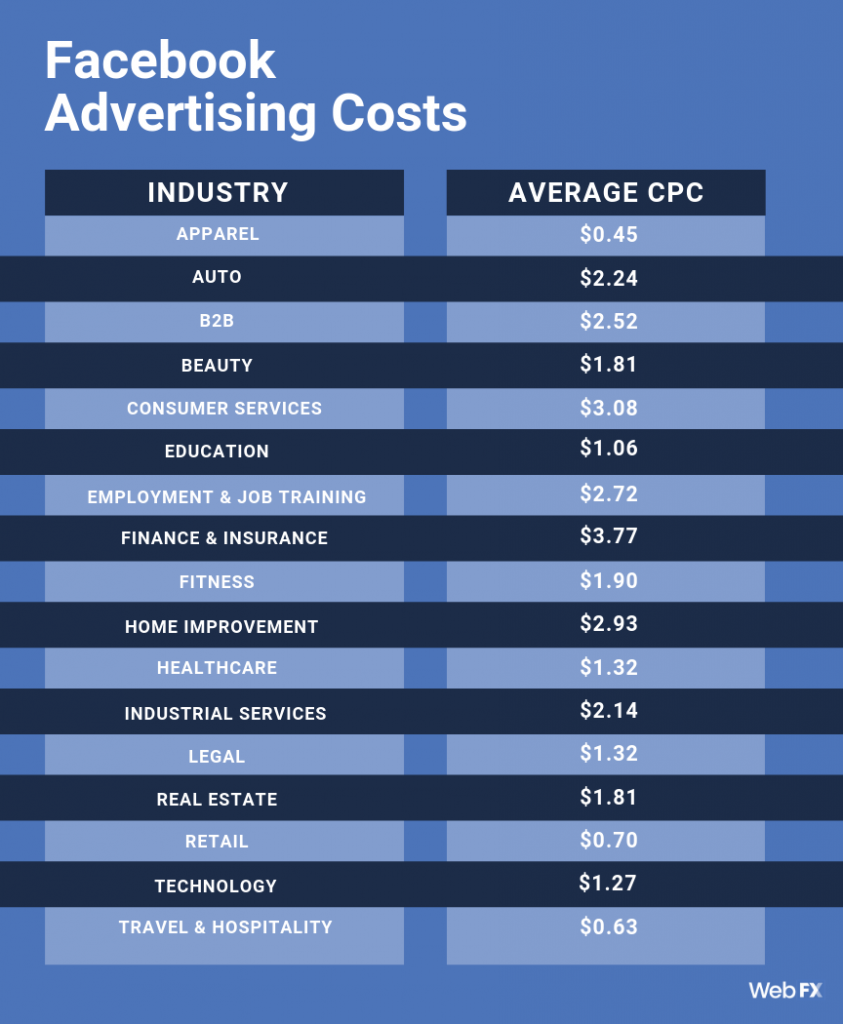
Ads are optional, it solely depends on you to use it, but it does provide a huge opportunity to expand your audience and take your business to all corners of the world.
Is it safe using a personal profile for Business?
Logically, yes, it is safe. But practically speaking, you will miss out on a plethora of marketing features when you use a personal profile for your Shopify store.
A business page can be optimized to get ranked in search engines like google, a personal profile cannot.
But, let’s imagine you are just starting, your business is yet to attract leads, then a personal profile might be feasible.
You can promote your Shopify store to your friends and families to acquire initial customers. But eventually, you’ll run out of friends, a personal profile allows only a maximum of 5000 friends, what will you do now?
That is why a business page is a viable option for a Shopify store in the long run. Now let’s dive into creatine one.
Step by step guide to creating a Facebook business page
Creating a page
One of the common questions asked in recent times is, how to create a Facebook page for your Shopify store. Creating a page on Facebook is effortless, navigate to pages creation, to create your business page.
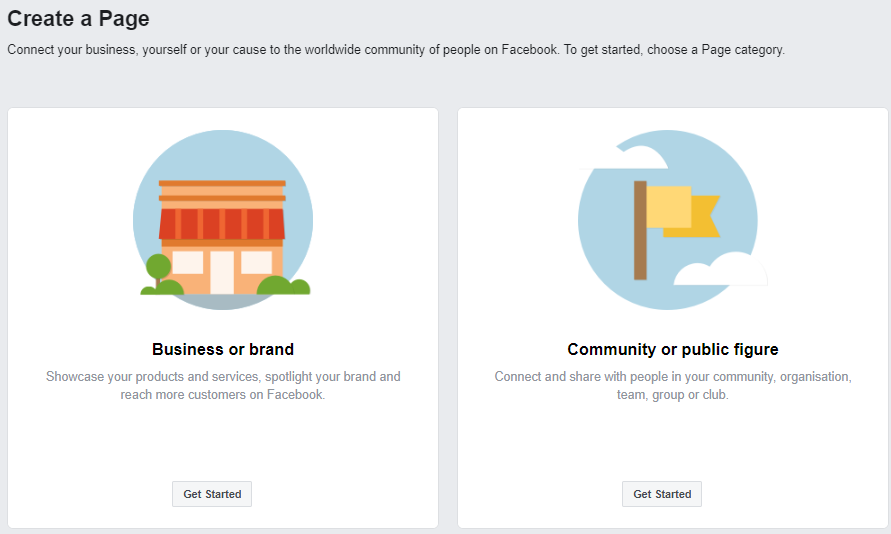
You’ll be prompted with two options,
- Business or brand
- Community or public figure
Each of these options has its features and metrics according to its purpose. Click ‘Business or brand’ to create your business page.
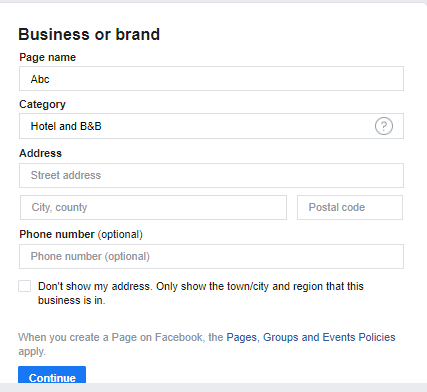
Now you’ll have to mention the basic details of your business page like,
- Page name
- Category
- Address
Don’t sweat it with the details you provide, you can change it anytime, even after your page is created.
Once you’ve entered the necessary details, click ‘continue’.
Add a Profile and Cover photo
Next, Facebook will ask you to upload a profile picture, you can skip it if you wish to do it later.
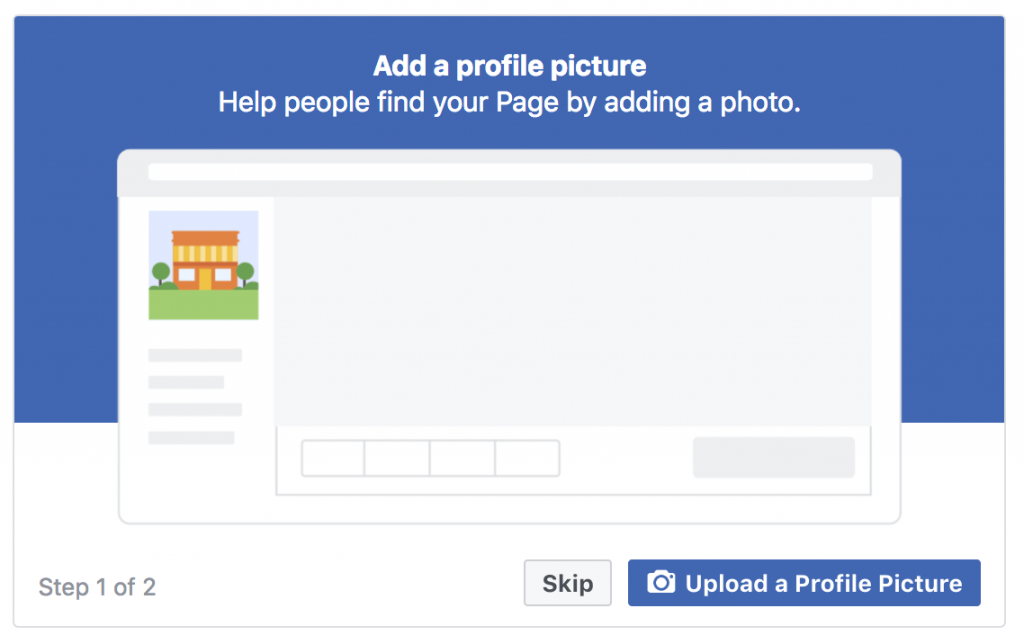
Profile photo – 170 x 170 pixels
This photo will be your index whenever your post or share something. Profile photo helps customers to identify your Shopify store, so upload your company logo as most businesses do. Tools like hatchful can help you create the best logo for your Shopify store.
Facebook will automatically crop it in a circular shape for your posts.
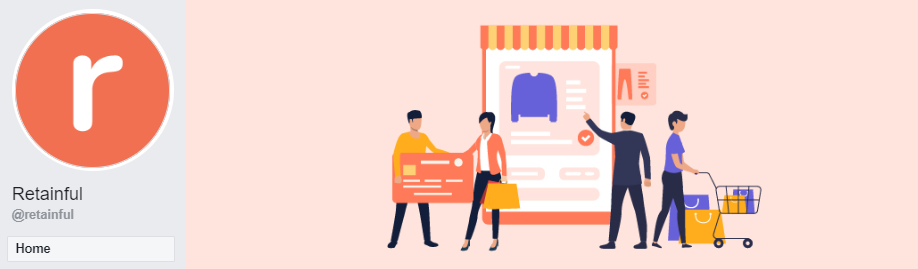
Once you’re done with your profile photo, you’ll be asked to upload a cover photo.
Cover photo – 820 x 462 pixels
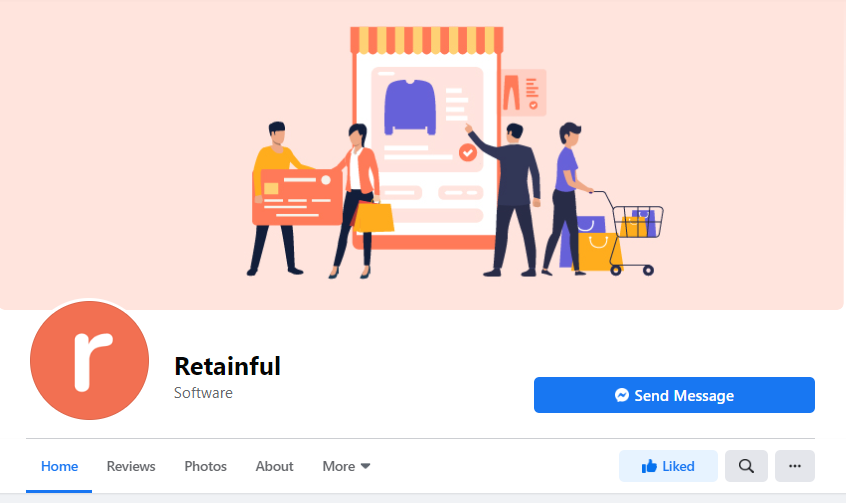
The cover photo is the first thing visitors see when he/she visits your page. So, make sure you choose an image that conveys a story as Retainful did.
Cover photos are displayed on computers at 820 x 312 pixels and mobile devices at 640 x 360 pixels.
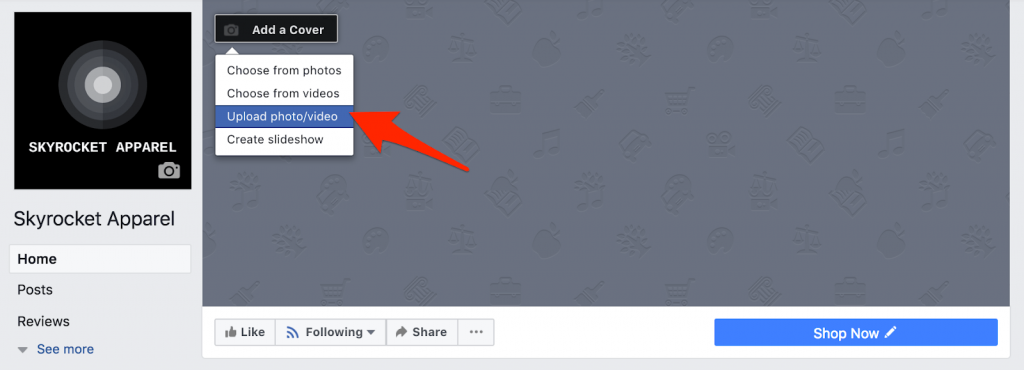
If you’re not interested in uploading a cover photo right away or just skip it. A brand new page will be displayed and now you can click ‘add cover’ to upload your cover photo.
As the cover is the first thing a visitor sees you can add a video as your cover photo. Videos are more engaging, and they can grab a customer’s attention better than an image.
You can add a video by clicking ‘Add a cover’ and then click ‘Choose from videos’ and select your video.
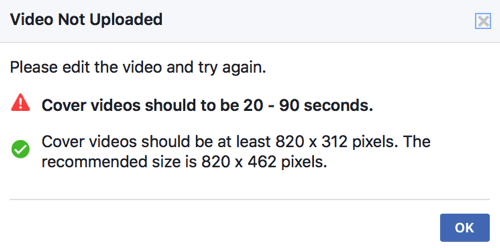
Facebook won’t allow you to upload a video if you don’t meet the requirements, so edit and trim your video precisely.
Fill out your Business information
Now that your page, the next step in your Facebook page checklist is uploading your Shopify store details.
Click on ‘page info’ to mention extensive details of your page,
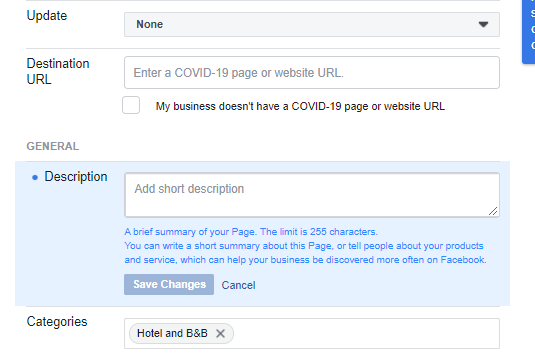
Description – Let people know in 155 characters what your page is for.
Categories – Categories help users find your website. You can choose 3 categories.
Contact information – Enter your phone number, website, and email address.
Place – Post your address here if you have a physical store.
Hours – If only selected times are available, please indicate here.
These sections will be available under the ‘page info’ section. Enter these fields carefully because it reflects your credibility.
These information will be displayed in the ‘About’ tab of your homepage, where you can add more business information.
You can also add your vision and mission statements, provide links to your other Social media accounts so your followers can find you easily.
Now that you’ve entered all your necessary information, you can move to the ‘General settings’ of your page.
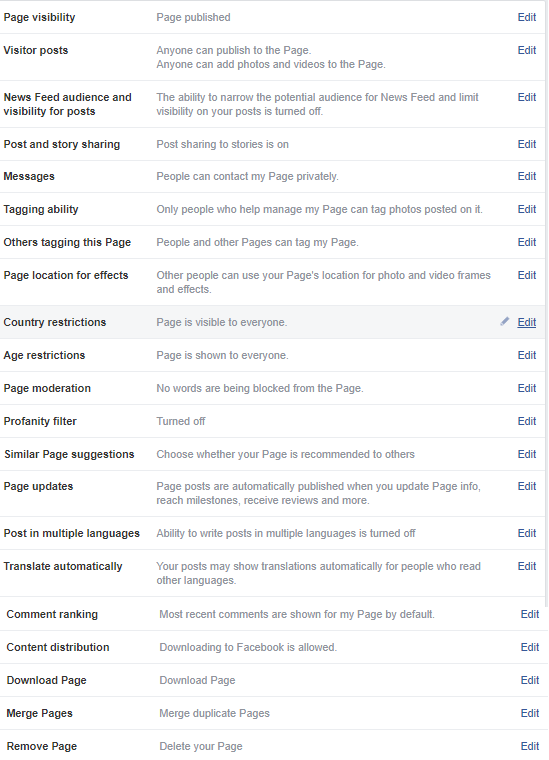
Most of these settings are basic, you can move on to the next step comfortably. But still, you can select who can see our page, who can send you messages from these settings.
You can even restrict kids from viewing your page if you’re going to post something provocative.
Go ahead, play with it and see which one suits your Shopify store better and we’ll move to the next step.
Page management sections
Your page should be shaping up really well right now if you’re following our Facebook page checklist. Now let’s discuss the page management sections that are at the top of your page.

Page – It will direct you to your homepage i.e. where you are now.
Inbox – You can manage the messages from your followers.
Notification – See your post’s interactions(Likes, comments, shares)
Insights – Your page’s performance metrics will be displayed.
Publishing Tools – Schedule your posts, see your post’s reach and engagement, and control the privacy of your posts.
Ad centre – Run an ad campaign for your Shopify store.
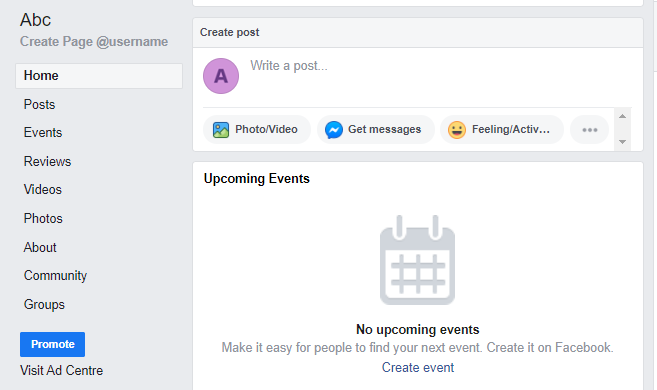
On the right side of a page you can see various tabs relating to your posts and page. You can directly see all the posts, images, videos you uploaded using these tabs.
Groups and community tabs will redirect you to the groups you created. You can view your page reviews and ratings under the review tab.
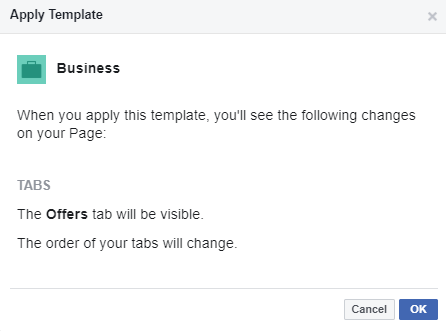
Customize your page with templates
Facebook allows you to customize your business page to make it more enticing to your audience.
There are ten pre-defined templates on Facebook, you can select a template that suits your Shopify store. Each template is designed to satisfy the needs of an organization.
Navigate to Settings → Templates and Tabs
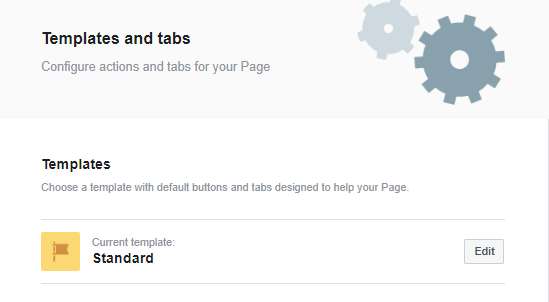
You can select a template that represents your business from the list,
- Standard page
- Business
- Venues
- Movies
- Charity
- Politicians
- Services
- Restaurants and cafes
- Shopping
- Video page

If you want to know more about the template, click ‘view details and you can see a preview of how your page will shape up after applying the template.
The significant difference between the templates will be the tab sections and the buttons on the toolbar.
Since you need a business page, select the business template, and click the ‘apply template’. Facebook will automatically update your page to the new template.
You can manually change the order of the tabs to suit your needs.
Retain customers effortlessly. Make your customers feel valued and appreciated with Retainful.
Edit Page roles and add team members
Once you’ve created a business page as per our Facebook page checklist, you can assign various members to perform specific activities on your page through the page roles.
Navigate to Settings → page roles
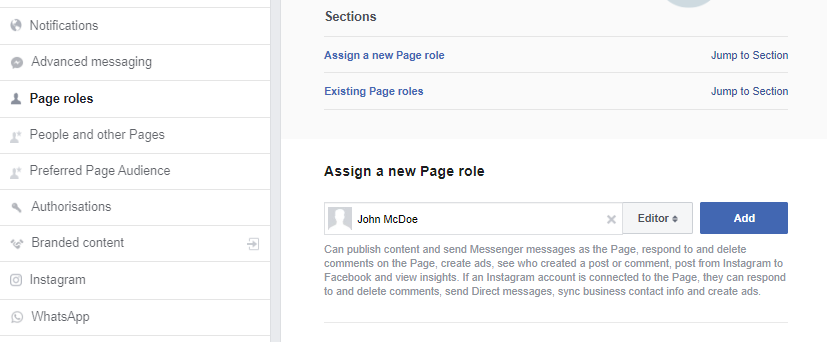
You just have to enter their email to find them. Then, Facebook allows you to select a page role from the list,
Admin – Has the entire access to the page.
Editor – Can edit the page, view insights, see who posted on the page, create ads, post as the page.
Moderator – Similar to the editor but additionally a moderator can respond to comments on the post.
Advertiser – Create ads and view metrics.
Analyst – Can view insights and see which admin created the post.
So, now your page can be managed by multiple people of various responsibilities without any fuss.
Additional to page roles you can also add your team members on your page.
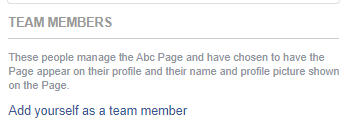
Adding your team members will foster trust and establish credibility and also you can promote your page to your team member.
Creating a username
Create a username so that people can find your page, your username will be the one used in all your Facebook interactions.
Your username is what people will use to tag your page in their posts. To create our username, navigate to About → Username.
The best practice is to use your brand name as your username so that people can find and tag you effortlessly.
Sometimes Facebook might not allow you to create a username because the name might be used by someone else.
In that case, you can add a suffix to your name. Most businesses use their business location or their category as a suffix.

You can see how Paul Mitchell used their business category as a suffix.
Make sure you use the same username for managing all your social media accounts.
Add necessary Call to action button
Call to action buttons is necessary to achieve conversions and generate leads.
Most business page templates will ‘add a button’ option on their homepage, click it.

You can choose a CTA button from a few options that Facebook displays,
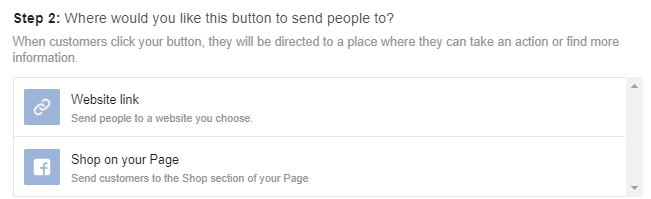
Each option will have a couple of CTA buttons to choose,
- Make a booking with you – Book now, Get Quote.
- Contact you – Contac us, Sign up, Send message, Send email, Call now, Whatsapp.
- Learn more about your business – Watch video, Learn more.
- Shop with you – Shop now, See offers, Purchase gift card.
- Download your app or play your game – Use app, Play game.
You can choose a button that suits your business and Facebook will show you a preview of how it will look.
So, if you own a Shopify store you can select the ‘shop now’ button to redirect your followers to your store. If you’re wondering how to connect Facebook to Shopify, this is one way to do it.
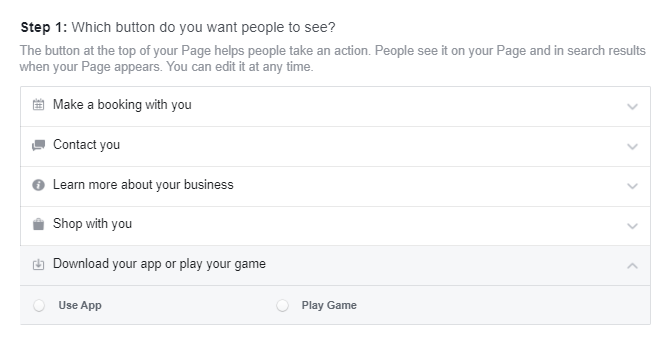
Click on ‘Website link’ and enter the URL to your website so that people can visit your Shopify store from your page. Once you are done with it click ’Finish’ to display the CTA button.
Publish your first post
A Facebook page checklist is redundant without a list likewise a Facebook page is useless without content, so create content and post it to entice and engage with your audience.
Facebook has many options that can help you customize your post.
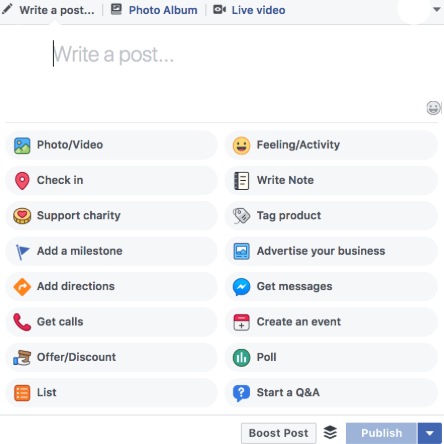
You can make a variety of posts using these options, for instance, you can create a poll to see how your followers respond to your call.
You can start a Q&A to find out if your page or store needs some change. Use any of these options to create a post and click ‘Publish’
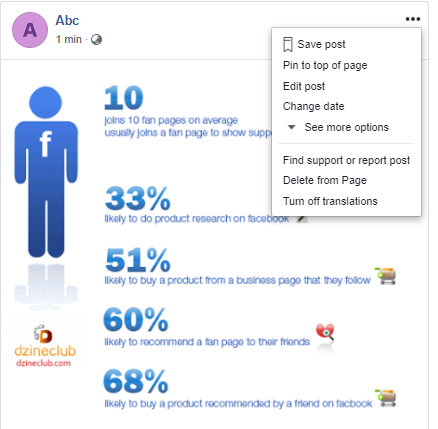
Once your post is published, click the three dots button to open post options.
Here you can interact with your post if your click ‘Pin to top of page’ your post will be displayed on the top, even before the current post.
Facebook has an automatic language translator that can help people by interpreting your captions in a language they prefer, the translator will be ‘ON’ by default.
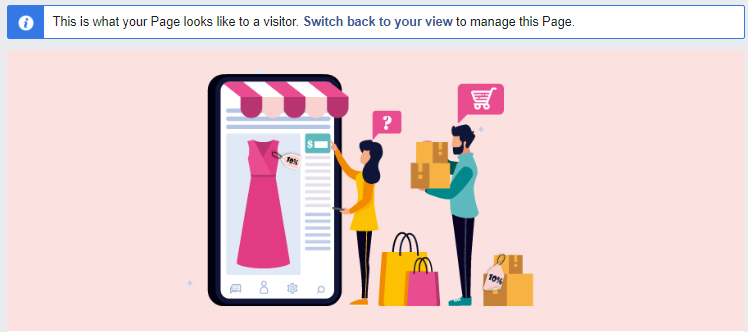
Review your page as a visitor
Reviewing your store can help you minimize a few blunders, Facebook has an illustrious feature for reviewing your page as a page visitor.
With this feature, you can view how your page will look in the eyes of a visitor. It’ll help you to see things and identify mistakes that you can’t see as an owner.
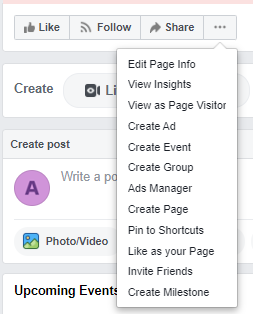
Click the three dots next to ‘share’ on your home, and select ‘View as page visitor’ from the dropdown.
Facebook will display your page from a page visitor’s perspective. You can review your page to find if any issues are there and then exit ‘View as page visitor by clicking ‘ Switch to our view’.
Make sure you perform this step regularly to see how your page has been shaping up ever since its inception.
Check your page insights
Creating a page and posting regularly doesn’t bring you success. The success of your page depends on how well you’re monitoring it.
You should view your Facebook insights regularly, see how many people you have reached, see which post has the highest interaction, and many more insights.
Use these crucial analytics to devise your plan, you can view your page insights by clicking ‘insights’ present on the top of the page.

You’ve created a new page, so the metrics would be empty, but after a few weeks your insights will look something like this,
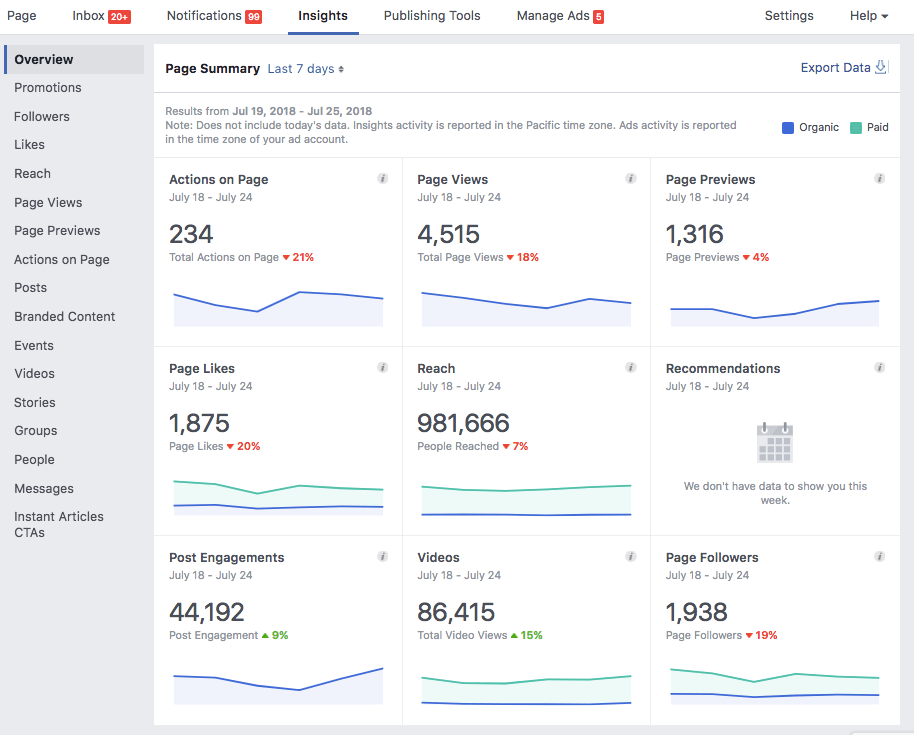
These are the metrics you can see once your page has gained more followers. Among all these metrics there are three sections which you need to pay more attention to,
Reach – This will show you how many people your post has reached.
Post engagements – These metrics show you the number of interactions(likes, comments, shares) your post.
Videos – It shows how many times your videos were played for more than 3 seconds.
Monitoring these metrics will give you a perspective on how people are receiving your posts. If your metrics are low, it shows that your posts aren’t engaging enough, so plan accordingly.
How to connect Shopify to Facebook?
Your Facebook page checklist is over, you’ve created a business page for your store. But Shopify offers an additional feature which is, creating a Facebook shop on your page.
So, how to connect Shopify to Facebook shop? Well, here it is
Navigate to your Shopify admin, click on ‘+’ next to Sales channels. Now the Add sales channel dialog will be displayed, click ‘Add Facebook’

Here you can connect your Facebook page and add your products to your Facebook shop.
The only catch is, you’ve to wait for 48 hours for Facebook to review your shop. Once reviewed your Facebook shop will be primed up and ready to boost your sales.
Increase customer retention by sending highly customized emails that engage customers with Retainful.
Wrapping up
We crafted this article to guide you on how to set up a Facebook page for your Shopify store with our Facebook page checklist.
Here we even showed you how to connect Shopify to Facebook shop which will prove to be the best choice during seasonal sales.
Facebook attracts millions of followers, so creating a page is a great way to achieve countless conversions and sales. Don’t limit your stores, expand your business to new horizons.